• About

All Sparkled Up

~ Like dew hanging from the tip of a leaf, a single bead or word adds sparkle where there was none. BE the bright!

All Sparkled Up

Author Archives: Julia Monroe

Pink

07 Tuesday Oct 2014

Posted by Julia Monroe in All Sparkled Up, color, family, flowers, grandkids, nature, photography, sparkling

≈ 3 Comments

Tags

All Sparkled Up, color, flowers, grandkids, nature, photography, photos, pink, pink things

Pink.

Pink rose petals

Pink rose petals


Pink Lego perfume bottle

Pink Lego perfume bottle


Pink Dragonwing Begonia

Pink Dragonwing Begonia


Pink icing

Pink icing


Pink bubble wands

Pink bubble wands


Pink happiness

Pink happiness


Pink roses

Pink roses


Pink bubbles

Pink bubbles


Pink building blocks

Pink building blocks


Pink lace

Pink lace


Pink flowers

Pink flowers


Pink beach sweetness

Pink beach sweetness

Share this:

  • Share on X (Opens in new window) X
  • Share on LinkedIn (Opens in new window) LinkedIn
  • Share on Facebook (Opens in new window) Facebook
  • Share on Pinterest (Opens in new window) Pinterest
  • Share on Reddit (Opens in new window) Reddit
  • Email a link to a friend (Opens in new window) Email
  • Print (Opens in new window) Print
  • Share on Tumblr (Opens in new window) Tumblr
Like Loading...

2 years ago today I got Scoliosis surgery

02 Thursday Oct 2014

Posted by Julia Monroe in All Sparkled Up, God, Scoliosis, time

≈ 2 Comments

Tags

encouragement, God, joy, prayer, Scoliosis, scoliosis surgery, surgery

It’s been two years since surgery. That’s very hard for me to understand. It seems like just yesterday I got the surgery and yet forever ago. The first year and a half was lost in a time warp. I know young people heal quickly from Scoliosis surgery but for older folks like me, it took a long time, especially since my back was broken and damaged even before the surgery. The past couple months have been very very good and I’m glad I got the surgery! Life is good and getting better all the time. =)

I don’t have any photos to share today but I will share here…
A Prayer of Thanksgiving.

Thank you, God, for this time in my life. It hasn’t been easy recovering the past couple years but you have been with me through it all. I remember the night a couple months after surgery and the pain was so great that I couldn’t sleep. I asked you if I could fall asleep in your palm and I fell asleep instantly. Many nights after that I would pray “Can I please fall asleep in your palm tonight?” and not ten seconds passed when I was asleep, even despite the piercing pain. You are amazing, God. Thank you for the comfort.

Thanks, God for helping me not panic. The times I lay there looking at the ceiling and couldn’t move without assistance, the times when I couldn’t move my arms, the times when I thought I would break all over again. But I didn’t and you calmed me down and let me know that it was ok to just rest. It was ok to not move. It was ok for weeks to go by and seasons to pass. Thank you for the calm that covered my spirit.

Thank you, God for letting my husband and sons be so amazing. You knew I didn’t have parents or sisters nearby. You knew it was just me and the boys. Thank you for all that encouragement and loving patience from my sons. They were amazing! Thank you for the two years of cooking they did. Thank you for their diligence in picking things up from the floor and getting things out of cupboards for me and moving stuff when I needed it. God, they gave up so much to take care of me. Thank you for their huge hearts, their abundant energy and their unstoppable encouragement. Thank you for their laughter. Bless them over and above what they gave away.

Thank you, God, for always thinking kind thoughts toward us. We mess things up so much. Thank you for giving us order when there is chaos and direction when we’re lost. Thank you for helping us when we make stupid mistakes. God, I made a really stupid mistake when I didn’t seek medical attention when my back broke. We humans truly are bleating sheep sometimes. Thank you for guiding us and steering us in the right direction.

God, I love living on this earth. Even with disability, I LOVE being here. There are beautiful people here. The heartbeat in this world is beautiful and worth sustaining. Please forgive us when we have a “broken back” and don’t seek the right solution, when we try to fix things on our own. Please help us go through the hard times to get to the better times, the times that you planned for us. Thank you for being incredibly patient with us all.

And God, thank you so much for letting me be able to walk.

In Jesus’ name, Amen.

Share this:

  • Share on X (Opens in new window) X
  • Share on LinkedIn (Opens in new window) LinkedIn
  • Share on Facebook (Opens in new window) Facebook
  • Share on Pinterest (Opens in new window) Pinterest
  • Share on Reddit (Opens in new window) Reddit
  • Email a link to a friend (Opens in new window) Email
  • Print (Opens in new window) Print
  • Share on Tumblr (Opens in new window) Tumblr
Like Loading...

Tea by the Sea

15 Monday Sep 2014

Posted by Julia Monroe in family, food, grandkids, nature, sunlight, tea time

≈ 5 Comments

Tags

beach, cakes, cookies, family, food, Mom, ocean, picnic basket, sunlight, sunset, tea, tea time, waiting

She’s six now. Last year she carried a ship to the beach. This year she carried a picnic basket.
1 Tea by the Sea
2 Tea by the Sea
3 Tea by the Sea
4 Tea by the Sea
The delicious treats filled the tray.
5 Tea by the Sea
6 Tea by the Sea
The blooming tea was still warm.
7 Tea by the Sea
8 Tea by the Sea
Coconut Cream glaze dripped down the blueberry pomegranate jam-filled cakes. Some were topped with toasted coconut and macadamias, others were topped with sugared rose and lilac petals. Vanilla pearls were sprinkled on top of shell-shaped spice Madeleines. Tiny oranges looked like blooming lotus blossoms and green and Concorde grapes filled the bowl. Crumbly Lavender Lemon Shortbread squares and tea cups were piled on the picnic basket top.

On the top tray: Vanilla Bean cakes filled with Blueberry Pomegranate Jam and topped with Coconut Cream Glaze, toasted coconut & macadamias, sugared lavender and rose petals. On the bottom tray, Spice Madeleines sprinkled with vanilla pearls. On the dessert plates under the tea cups: Lavender Lemon Shortbread.

On the top tray: Vanilla Bean cakes filled with Blueberry Pomegranate Jam and topped with Coconut Cream Glaze, toasted coconut & macadamias, sugared lavender and rose petals. On the bottom tray, Spice Madeleines sprinkled with vanilla pearls. On the dessert plates under the tea cups: Lavender Lemon Shortbread.

10 Tea by the Sea
She poured a cup of tea and waited by the sea.
11 Tea by the Sea
The sunset was soft and dreamy.
12 Tea by the Sea
The breeze was warm and welcome.
13 Tea by the Sea
The colors were slipping away and still she waited.
14 Tea by the Sea
She didn’t stop hoping
15 Tea by the Sea
And finally her mom sat down. Even when the sunset is gone, Tea by the Sea is best with mom.
16 Tea by the Sea

[We had a wonderful time making the treats for this, setting up the table and photographing it all. Thank you, Gabriel Monroe, for being second shooter and lighting expert. Thank you, Donna, for your lovely suggestions and help. Thank you, Uncle Butch and Aunt Dilly, for the use of your beautiful chair! We had a splendid time and it was perfect.
The lovely lace-embossed Filigree appetizer plates, bowl and infinity tray are by Rosanna, Inc.]

Share this:

  • Share on X (Opens in new window) X
  • Share on LinkedIn (Opens in new window) LinkedIn
  • Share on Facebook (Opens in new window) Facebook
  • Share on Pinterest (Opens in new window) Pinterest
  • Share on Reddit (Opens in new window) Reddit
  • Email a link to a friend (Opens in new window) Email
  • Print (Opens in new window) Print
  • Share on Tumblr (Opens in new window) Tumblr
Like Loading...

Psalm 89 8-9

14 Sunday Sep 2014

Posted by Julia Monroe in All Sparkled Up, God, Inspirational, Scripture, sunlight, words

≈ 1 Comment

Tags

God, inspirational, ocean, scripture, Sunset Beach, waves

photo card Ps 89 8-9 p

Please feel free to print this 4″x6″ inspirational card. Click on the photo to access a larger image.

This photo was taken yesterday at Sunset Beach, NC. I still remember the sound of the waves and the warm moist breeze on my skin. Shh… breathe…

God is good.

Share this:

  • Share on X (Opens in new window) X
  • Share on LinkedIn (Opens in new window) LinkedIn
  • Share on Facebook (Opens in new window) Facebook
  • Share on Pinterest (Opens in new window) Pinterest
  • Share on Reddit (Opens in new window) Reddit
  • Email a link to a friend (Opens in new window) Email
  • Print (Opens in new window) Print
  • Share on Tumblr (Opens in new window) Tumblr
Like Loading...

I’m glad it’s still summer

04 Thursday Sep 2014

Posted by Julia Monroe in flowers, gardening

≈ Leave a comment

Tags

begonia, flowers, gardening, heirloom tomatoes, plants, summer, vinca

It’s September 4th but I’m rejoicing in the summer cicadas, the sun’s heat on my skin, the tomatoes that are still trying.
1 late summer 14

Dragon Wing Begonia

Dragon Wing Begonia


Trailing Vinca

Trailing Vinca


4  late summer 14
Out of four vigourously growing Heirloom tomatoes, only one bore fruit, much to our dismay. But the flavor was so spectacular that we will try again next year.

Out of four vigourously growing Heirloom tomatoes, only one bore fruit, much to our dismay. But the flavor was so spectacular that we will try again next year.


New growth is appearing at the base of one of the Heirloom tomatoes.

New growth is appearing at the base of one of the Heirloom tomatoes.

Share this:

  • Share on X (Opens in new window) X
  • Share on LinkedIn (Opens in new window) LinkedIn
  • Share on Facebook (Opens in new window) Facebook
  • Share on Pinterest (Opens in new window) Pinterest
  • Share on Reddit (Opens in new window) Reddit
  • Email a link to a friend (Opens in new window) Email
  • Print (Opens in new window) Print
  • Share on Tumblr (Opens in new window) Tumblr
Like Loading...

Table centerpiece using four mugs and a vintage cake pedestal

03 Wednesday Sep 2014

Posted by Julia Monroe in flowers, home decor, party, tea time

≈ Leave a comment

Tags

centerpiece, dessert tea, floral arrangement, flowers, Inc, mugs, pedestal, Rosanna, table, table setting, tablescape

That was a long subject. Ha! I had a dessert tea a couple months ago and this was the centerpiece. I used four beautiful mugs from Rosanna, Inc and placed them on a vintage dessert pedestal that was my mom’s. It was so easy to arrange the flowers in the mugs! I’ll be doing this again. After the event, I put away the pedestal but kept the flowers on the table a while. They were so pretty with the elegant gold china designs.

Rosanna's Luxe Moderne Mugs make the perfect "vase" for the flower arrangement.

Rosanna’s Luxe Moderne Mugs make the perfect “vase” for the flower arrangement.

Share this:

  • Share on X (Opens in new window) X
  • Share on LinkedIn (Opens in new window) LinkedIn
  • Share on Facebook (Opens in new window) Facebook
  • Share on Pinterest (Opens in new window) Pinterest
  • Share on Reddit (Opens in new window) Reddit
  • Email a link to a friend (Opens in new window) Email
  • Print (Opens in new window) Print
  • Share on Tumblr (Opens in new window) Tumblr
Like Loading...

Sugar Bonnets

02 Tuesday Sep 2014

Posted by Julia Monroe in cake decorating, candy, crafts, food, recipe, tea time, tutorial, Uncategorized

≈ 6 Comments

Tags

cake decorations, DIY, food, pressed sugar, recipe, sugar, Sugar Bonnet, Sugar Bonnets, sugar cubes, sugar decorations, Sugar Hats, sweets, tea time, tutorial

1 Sugar Bonnets

Sugar Bonnets, made with just sugar and water and a tiny bit of food color for the decoration. Each one is about 1 teaspoon of sugar.

I’ve been making these Sugar Bonnets for many years and used to sell them to a local tea room. Now I just make them to keep on hand for guests. They can be used for cake decorations but I just use them as sugar cubes to sweeten tea. Recently I made a batch for a Dessert Tea.

The Dessert Tea was so much fun! The tablescape was actually my entry for a Dessert Tablescape Contest by Rosanna Inc, which I will post about soon. Every year Rosanna has a terrific tablescape contest and the entries are beautiful. I seriously adore Rosanna’s style and look forward to seeing the entries every year. This is the first time I’ve entered and I’ll definitely be doing this again.

Oh my goodness, I had so much fun setting the table and baking all the treats! I’m looking forward to sharing photos with you soon.

I didn’t have a smaller table for my entry so there was a lot of table space to fill. I spread things out a bit and placed all the desserts on the front of the table but the back of the table had tea items, including a dish of Sugar Bonnets for the tea.

The back of the Dessert Table had items for tea, including a dish of Sugar Bonnets.

The back of the Dessert Table had items for tea, including a dish of Sugar Bonnets.

This is the recipe I wrote a long time ago for making Sugar Bonnets.

This is my recipe for Sugar Bonnets, written over 15 years ago.

This is my recipe for Sugar Bonnets, written well over a decade ago. I can’t even remember!

Each bonnet is about 1 teaspoon of sugar. The ingredients are just sugar and water. Perhaps with a little food coloring if you want other colors. They dissolve quickly in a cup of hot tea.

I do confess it takes dexterity and patience to make these but the effort is well worth it. And they keep for several years in an airtight container between layers of wax paper, perfect for on the tea tray.

I created the hat form from a cake decorating lily nail set, matte board and packing tape. There is a piece of packing-tape-wrapped matte board wrapped around the nail to form a small smooth edge, which becomes the hat brim. I’ve replaced the matte board and tape only once and it has held up amazingly well, even with a quick wash and air dry. Some day I’ll cut a piece of PVC pipe to replace the matte board piece.

4 Sugar Bonnets

The tools I use to make the Sugar Bonnets include a Lily Nail that I’ve adapted with tape and matte board.

5 Sugar Bonnets

The bottom of the lily nail, showing how the matte board has been secured to the nail.

I use a small baby spoon to spoon damp sugar into the lily nail. This is how I hold the nail while spooning in the sugar and making the initial “press” with the top of the lily nail. Holding the nail this way helps the sugar stick together around the “brim” of the hat.

6 Sugar Bonnets

Holding the custom lily nail before spooning in the damp sugar.

After spooning the damp sugar in the mold, the top of the lily nail is pressed down on the damp sugar and then the excess sugar is scraped off around the edge.

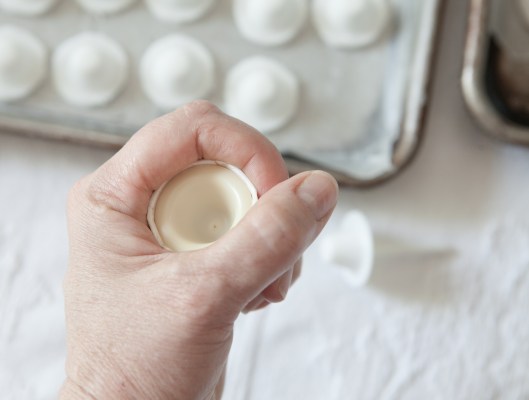
I’m sorry that I don’t have actual action photos since I didn’t have time to set up a tripod and remote. Holding a heavy camera with one hand to take a photo of your other hand sure isn’t easy! So I’ve reenacted a couple of the important steps. Here I’ve placed a dry sugar bonnet back in the mold. If the sugar were freshly pressed, it would fit tightly in the mold and the lily nail would be a tight fit on top of sugar.

The top of the lily nail is removed. Note: if the sugar sticks too much to either piece of the lily nail, wipe them clean with a damp cloth, dry them and then brush on a little bit of cornstarch with a clean paint brush. The amount is so small that you can’t even see it but it makes a difference.

7 Sugar Bonnets

The lily nail set with a sugar bonnet pressed in between.

8 Sugar Bonnets

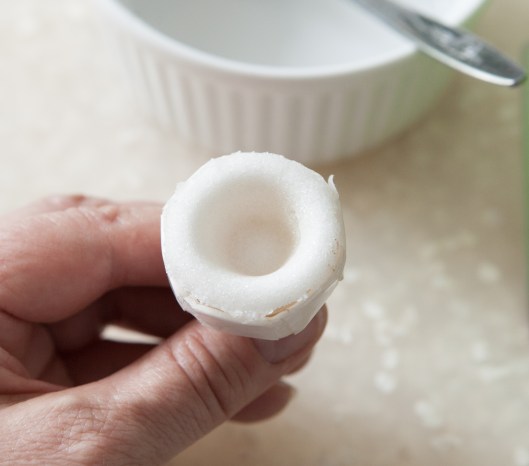
The top of the lily nail is removed to show the shaped sugar piece.

The hardest part of making these is tapping out the fragile, freshly pressed sugar bonnet on the wax-paper lined cookie sheet. The sugar usually sticks a little in the mold so I hold the lily nail right above the cookie sheet and tap on the handle of the nail with the spatula and the hat drops right out.

9 Sugar Bonnets

The bonnets can not be moved for at least 15 minutes. Then I’ll carefully slide the barely dried ones in neat rows to dry further as I make more. They must be dried overnight to be strong enough to be handled.

10 Sugar Bonnets

If the sugar breaks as it’s tapped out of the mold, I just push the broken pieces aside.

11 Sugar Bonnets

There will be broken pieces. Even with a very light dusting of corn starch, the sugar still sticks a little in the mold.

Some broken pieces are inevitable. They can be reused if you mix the sugar immediately back in with the damp sugar. If they are even the tiniest dry on the edges, they can not be reused.

Some broken pieces are inevitable. They can be reused if you mix the sugar immediately back in with the damp sugar. If they are even the tiniest dry on the edges, they can not be reused.

When the bonnets are dry, they are surprisingly sturdy. Once all the bonnets are drying, I make the sugar decorations.

Royal icing doesn’t melt in tea so the decorations are made like the bonnets, just sugar and water, perhaps colored with a little food coloring, then pressed into flower and leaf molds.

Sugar Bonnet decorations made of sugar, water and a little food coloring.

Sugar Bonnet decorations made of sugar, water and a little food coloring.

To make the decorating process more efficient, I line up all the decorations as they will be used on each sugar bonnet.
14 IMG_5027-2
The bonnet decorations are attached using a drop or two of “sugar paste” which is simply sugar and water mixed together. I crush a bit of the sugar grains up with the back of the spoon while stirring in the water. The consistency is thick, but not dry.

Sugar and water are mixed to make the gritty "sugar paste" to attach the sugar decorations.

Sugar and water are mixed to make the gritty “sugar paste” to attach the sugar decorations.

16 Sugar Bonnets

Small imperfections and cracks in the side of the hats aren’t a problem since decorations can be glued over the holes.

17 Sugar Bonnets

A small bit of sticky “sugar paste” covers a crack in the side.

Even a large hole can be covered using a decoration.
18 Sugar Bonnets
19 Sugar Bonnets
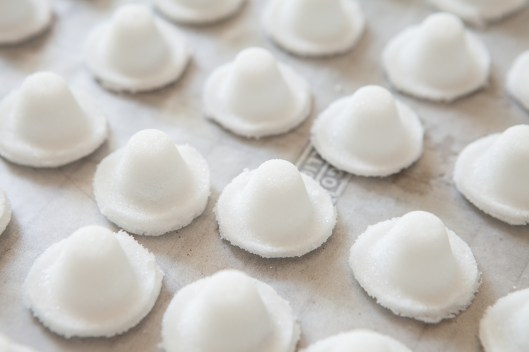
It’s so satisfying to see an entire cookie sheet covered with drying Sugar Bonnets.

The Sugar Bonnets are decorated and drying.

The Sugar Bonnets are decorated and drying.

The only sweetener better than a sugar cube is a Sugar Bonnet.

The birthday girl drops a little Sugar Bonnet in her cup of tea.

The birthday girl drops a little Sugar Bonnet in her cup of tea.

It quickly dissolved.

The Sugar Bonnet quickly and completely dissolves in the cup of hot tea.

The Sugar Bonnet quickly and completely dissolves in the cup of hot tea.

If you want less than one teaspoon of sugar in your tea, simply break a Sugar Bonnet into pieces.

Aren’t Sugar Bonnets sweet? Please let me know if you make them!

My granddaughter hold a little Sugar Bonnet before dropping it in her tea.

My granddaughter holds a little Sugar Bonnet before dropping it in her tea.

Share this:

  • Share on X (Opens in new window) X
  • Share on LinkedIn (Opens in new window) LinkedIn
  • Share on Facebook (Opens in new window) Facebook
  • Share on Pinterest (Opens in new window) Pinterest
  • Share on Reddit (Opens in new window) Reddit
  • Email a link to a friend (Opens in new window) Email
  • Print (Opens in new window) Print
  • Share on Tumblr (Opens in new window) Tumblr
Like Loading...

Meringue Breakfast Buns

31 Sunday Aug 2014

Posted by Julia Monroe in baking, food, recipe

≈ 6 Comments

Tags

baking, breakfast, eggs, food, meringue, Meringue Breakfast Buns, recipe

So much has happened since I last posted. I’m sorry for the long delay. Please accept my apologies. Some bloggers have trouble coming up with topics to write about but my problem is I’ve got too much.

One thing I’ve been busy with is cooking and baking. I didn’t cook or bake much for almost three years so I’m thrilled to be back in the kitchen again!

My mom was visiting and I didn’t have anything special for breakfast except for day old buns and eggs. So I whipped up these Meringue Breakfast Buns. They were delicious and perfect for guests.

Meringue Breakfast Buns - an egg yolk in a bun topped with cheesy meringue, served with Balsamic Cucumber Raspberry relish and sour cream.

Meringue Breakfast Buns – an egg yolk in a bun topped with cheesy meringue, served with Balsamic Cucumber Raspberry relish and sour cream.

You can make any quantity you want, but I like to make a dozen at a time and refrigerate the leftovers to eat cold for lunch the next day. The cheese won’t be crisp anymore but they are still delicious. They’re great for breakfast on the run too.

MERINGUE BREAKFAST BUNS

Ingredients:

~ 12 small rolls, about the size of a small muffin or cupcake. This is a good time to use day-old rolls too.
~ 12 egg yolks
~ 3 or 4 egg whites (reserve the remaining egg whites for some other recipe)
~ 1/8 tsp cream of tartar
~ Olive oil (optional)
~ About 1 cup grated cheese, any kind
~ Salt and pepper
~ Dried or fresh herbs of your choice
~ Herb dipping oil (optional)

Start by preparing the rolls. This can be done the night before if you want to save time in the morning. Use a small paring knife to cut a piece out of the bottom of the rolls or buns. The portion I cut out looks like a shallow little cone. You don’t need to cut much out, just enough for an egg yolk with a little cheese. Place the rolls cut side up in a muffin tin. Brush the inside with olive oil if you want. I’ve used olive oil or softened butter or nothing and they’re all good.

Slip one egg yolk in each bun.

Sprinkle the egg yolk with a little grated cheese and herbs of your choice.

Sprinkle the egg yolk with a little grated cheese and herbs of your choice.

To make a dozen Meringue Breakfast Buns, you’ll need a dozen egg yolks but only 3 or 4 egg whites. [Note: Save the rest of the egg whites for another recipe or cook them in a skillet to make Roulades, shown further down this post.]
Beat 3 or 4 egg whites with 1/8 tsp cream of tartar until fluffy. The meringue won’t look the same or peak the same as a dessert meringue that has added sugar. Don’t worry, it will still bake nicely on top of the buns.

Sprinkle grated cheese on top of the meringues.

Sprinkle grated cheese on top of the meringues.

Sprinkle a little grated cheese on top of each egg yolk. Add a little sprinkle of herbs over each yolk.

Use a spoon to spread meringue over each egg yolk. Cover the top completely.

Sprinkle more cheese and salt and pepper over the top of each meringue.

Sprinkle grated cheese on top of the meringues.

Sprinkle grated cheese on top of the meringues.

Here you can see I left some meringues without cheese.
4 Meringue Breakfast Buns
5 Meringue Breakfast Buns
Cheddar cheese is great but I’m partial to asiago.

Grated asiago and dried herbs sprinkled over the egg yolk in the bun.

Grated asiago and dried herbs sprinkled over the egg yolk in the bun.

7 Meringue Breakfast Buns

Look at all that fluffy meringue!

Look at all that fluffy meringue!

Brush the leftover cutouts from the rolls with herb dipping oil and place them on a cookie sheet to bake at the same time as the Meringue Buns.

The little cutouts from the rolls are brushed with herb dipping oil and baked in on a separate pan.

The little cutouts from the rolls are brushed with herb dipping oil and baked in on a separate pan.

When picking buns to use, make sure they are small enough to be placed in the muffin tin. For this batch, the buns were bigger so they touched and barely fit in the pan.
10 Meringue Breakfast Buns
If the buns are a tight squeeze, try not to let the meringues touch when you spread the tops.

Try not to let the meringues touch so they can be separated easy after baking.

Try not to let the meringues touch so they can be separated easy after baking.

Both Meringue topped buns and the small roll cutouts are baked at the same time at 375 degrees. The cutouts will be done after about 10 minutes but the buns stay in longer. (In this photo, I baked the cutouts and slices of leftover buns to make croutons for a future use.)
All ovens are different. In my oven, a LIQUID center egg yolk takes 15 minutes, a SOFT BOILED egg yolk takes 16 minutes, and a HARD BOILED egg yolk takes 17 minutes. If you’re going to eat these cold the next day, bake 16 or 17 minutes.

Bake brushed roll pieces for 10 minutes at 375. Bake Meringue Buns for 15 minutes for a liquid center yolk, 16 minutes for a soft-boiled yolk and 17 minutes for a hard-boiled yolk.

Bake brushed roll pieces for 10 minutes at 375. Bake Meringue Buns for 15 minutes for a liquid center yolk, 16 minutes for a soft-boiled yolk and 17 minutes for a hard-boiled yolk.

The cheesy topping on these is amazing! It forms a delicious crispy shell on top of the meringue!
13 Meringue Breakfast Buns
14 Meringue Breakfast Buns
15 Meringue Breakfast Buns

Fun to eat and Yummy!

Fun to eat and Yummy!

17 Meringue Breakfast Buns

Egg White Roulade
I spread the leftover, fluffy beaten egg whites in a medium hot skillet, lightly greased with olive oil, about 1″ thick and sprinkled herbs and pepper over the surface. When the bottom was golden, I flipped the egg white over till it was golden brown. The hot baked egg white was sprinkled with cheese and rolled up.

The cooked egg white rolled up.

The cooked egg white rolled up.

19 Meringue Breakfast Buns

20 Meringue Breakfast Buns

Meringue Breakfast Buns, with crisp cheese-topped meringue and hot, liquid egg yolk inside.

To make the Cucumber Raspberry Relish, I simply diced a cucumber with raspberries and tossed the mixture with balsamic vinegar, boiled apple cider and a little salt and pepper. It was so good with the eggs!

Meringue Breakfast Buns, hot from the oven, served with Cucumber Raspberry Relish and Sour Cream.

Meringue Breakfast Buns, hot from the oven, served with Cucumber Raspberry Relish and Sour Cream.

Share this:

  • Share on X (Opens in new window) X
  • Share on LinkedIn (Opens in new window) LinkedIn
  • Share on Facebook (Opens in new window) Facebook
  • Share on Pinterest (Opens in new window) Pinterest
  • Share on Reddit (Opens in new window) Reddit
  • Email a link to a friend (Opens in new window) Email
  • Print (Opens in new window) Print
  • Share on Tumblr (Opens in new window) Tumblr
Like Loading...

On my worktable – Dress Cookies

25 Friday Jul 2014

Posted by Julia Monroe in All Sparkled Up, baking, food, On my Worktable

≈ 7 Comments

Tags

cookie, cookies, dessert, flow icing, food, painted cookies

Today I have cookies on my worktable. This is the second time I’ve topped a cookie with flow icing. It’s not too hard if you get the Royal Icing consistency right. Fortunately, we were glad some cookies didn’t turn out so we could eat them. This is the first time painting on a cookie. Easier than I thought and quite fun.
In the little dish – kirsch mixed with edible gold dust. In the shot glass – more kirsch that needed stirring into the mixture as it evaporated.

Painting the cookie with gold dust mixed with kirsch.

Painting the cookie with gold dust mixed with kirsch.

Dessert Tea-2

Dessert Tea-3

The designs were inspired by Rosanna’s beautiful white and gold Luxe Moderne mugs.

Share this:

  • Share on X (Opens in new window) X
  • Share on LinkedIn (Opens in new window) LinkedIn
  • Share on Facebook (Opens in new window) Facebook
  • Share on Pinterest (Opens in new window) Pinterest
  • Share on Reddit (Opens in new window) Reddit
  • Email a link to a friend (Opens in new window) Email
  • Print (Opens in new window) Print
  • Share on Tumblr (Opens in new window) Tumblr
Like Loading...

Bears in the Sand Box

16 Wednesday Jul 2014

Posted by Julia Monroe in Little Plastic Bears, nature

≈ 2 Comments

Tags

beach, Little Plastic Bears, playing in sand, sand, sand box, sand play

This is what happens when Grandma plays in the sand box.

Pink Bear and Spotted Bear in the sand box, thinking of the beach!

Pink Bear and Spotted Bear in the sand box, thinking of the beach!


When was the last time you played in sand? We keep a bin of sand on a side table on the deck for the grandchildren to play with. It keeps them busy and happy for hours!
Now I know why – Sand is summer’s velvet!

Share this:

  • Share on X (Opens in new window) X
  • Share on LinkedIn (Opens in new window) LinkedIn
  • Share on Facebook (Opens in new window) Facebook
  • Share on Pinterest (Opens in new window) Pinterest
  • Share on Reddit (Opens in new window) Reddit
  • Email a link to a friend (Opens in new window) Email
  • Print (Opens in new window) Print
  • Share on Tumblr (Opens in new window) Tumblr
Like Loading...
← Older posts
Newer posts →

If you are a non-WordPress follower, enter your email address to follow this blog and receive notifications of new posts by email.

Tags

All Sparkled Up allsparkledup altered book art baking beach beads bird bread breakfast cake candy carving cat cats chocolate Christmas Christmas tree cookies craft crafts dessert DIY Easter Easter eggs eggs egg tree encouragement fabric family figs flowers food funny gardening Gilded Girls God granddaughter grandkids heart home decor hope inspiration inspirational jewelry jewelry making joconde light Little Plastic Bears miniature miniatures mixed media mousse nature painting PB & J pets photo photography projects recipe roses salad Scoliosis scripture sewing snow sparkling Spoonflower sunlight sunset Sunset Beach surgery tablescape tea tree tutorial Valentine's Day vintage book words

Archived Posts

Top Posts & Pages

Marble window sills
Post-it-Note Pocket from three sticky notes
Ballerina Cake Pops!
The Moss Rose Bracelet is finished
The Snow and Crystal Tree and Tendril Snowflakes

Recent Posts

  • Today I remembered something that used to sparkle…
  • Sfogliatelle
  • Blue Willow Toile
  • The Kitchen tea towel
  • The little cake she decorated
  • Icing flowers
  • Matthew 11:28
  • Christmas at Sea Tablescape
  • Gratitude
  • The Hot Air Balloon mobile has lights
  • Journaling in Coloring Books
  • The Light is still here.
  • A Hot Air Balloon decoration for my granddaughter’s room
  • Coco’s new favorite hangout
  • My kitten is growing

Post Categories

All Sparkled Up allsparkledup altered books American Girl Dolls art baking Baking for Neighbors ballet beach beading BFN birthday books cake decorating calligraphy candy cats Christmas color community cooking Craft Fail crafts DIY dolls drawing Easter encouragement Etsy fabric family fashion design Favorite Childhood Books flowers food Free Idea funny gardening Gilded Girls Gilded Life God granddaughter grandkids handmade books holiday home home decor Inspirational jewelry making journals lighting Little Plastic Bears Mexican miniature mixed media music nature New Years On my Worktable painting party pets photography Princess doll projects recipe Scoliosis Scripture sewing sketchbook sparkling Spoonflower sunlight sunset tea time Thanksgiving The cats time tools travel tutorial Uncategorized Valentine's Day water wedding woodwork words wreath
Follow All Sparkled Up on WordPress.com

Create a free website or blog at WordPress.com.

Privacy & Cookies: This site uses cookies. By continuing to use this website, you agree to their use.
To find out more, including how to control cookies, see here: Cookie Policy
  • Subscribe Subscribed
    • All Sparkled Up
    • Join 287 other subscribers
    • Already have a WordPress.com account? Log in now.
    • All Sparkled Up
    • Subscribe Subscribed
    • Sign up
    • Log in
    • Report this content
    • View site in Reader
    • Manage subscriptions
    • Collapse this bar
 

Loading Comments...
 

    %d