• About

All Sparkled Up

~ Like dew hanging from the tip of a leaf, a single bead or word adds sparkle where there was none. BE the bright!

All Sparkled Up

Category Archives: projects

The Hot Air Balloon mobile has lights

30 Monday Oct 2017

Posted by Julia Monroe in All Sparkled Up, crafts, DIY, home decor, lighting, projects

≈ Leave a comment

Tags

crafts, home decor, hot air balloon, mobile

The Hot Air Balloon mobile I made for my granddaughter needed a couple more touches.
I added small paper flowers around the basket.

Paper flowers were glued around the hot air balloon basket.


I think another set of mini lights will be good but the softness with just one set of lights is so pretty!

The string of mini lights in this paper balloon add a lovely soft glow.


Hot Air Balloon mobile with lights.


Hot Air Balloon mobile made from a Japanese paper ball, lit with mini lights.


There wasn’t much contrast in the colors of this mobile. But once I added the lights, my baby granddaughter won’t stop looking at it. :)

Share this:

  • Click to share on Twitter (Opens in new window)
  • Click to share on LinkedIn (Opens in new window)
  • Click to share on Facebook (Opens in new window)
  • Click to share on Pinterest (Opens in new window)
  • Click to share on Reddit (Opens in new window)
  • Click to email a link to a friend (Opens in new window)
  • Click to print (Opens in new window)
  • Click to share on Tumblr (Opens in new window)

Like this:

Like Loading...

A Hot Air Balloon decoration for my granddaughter’s room

02 Saturday Sep 2017

Posted by Julia Monroe in All Sparkled Up, allsparkledup, crafts, granddaughter, grandkids, home decor, On my Worktable, projects, Uncategorized

≈ 1 Comment

Tags

decorating, granddaughter, home decor, hot air balloon

We have a precious new granddaughter. ♥

I wanted to make something special for her room so I made a Hot Air Balloon mobile to hang up.

Hot Air Balloon mobile, made from a Japanese paper ball, embroidery hoop, basket and brass charms.


The beautiful paper ball was purchased when two of my sons and I visited Tokyo a couple years ago, so the Japan connection is very special to my son. He also has been on a hot air balloon team so thus the connection to hot air balloons.

Hot Air Balloon decoration to hang in my granddaughter’s room.


My daughter-in-law loves butterflies so I was really happy to find the metal filligree butterflies and brass keys in my craft supplies.

Brass butterfly charm sewn to the side of the basket


The hardest part of making this was tying all the knots equidistant from the top of the balloon so it hung straight.


I hope my granddaughter enjoys it for many years.

Share this:

  • Click to share on Twitter (Opens in new window)
  • Click to share on LinkedIn (Opens in new window)
  • Click to share on Facebook (Opens in new window)
  • Click to share on Pinterest (Opens in new window)
  • Click to share on Reddit (Opens in new window)
  • Click to email a link to a friend (Opens in new window)
  • Click to print (Opens in new window)
  • Click to share on Tumblr (Opens in new window)

Like this:

Like Loading...

Happy Valentine’s Day!

14 Tuesday Feb 2017

Posted by Julia Monroe in allsparkledup, art, crafts, encouragement, flowers, home decor, photography, projects, sewing, sparkling, Uncategorized, Valentine's Day

≈ Leave a comment

Tags

All Sparkled Up, allsparkledup, allsparkledupdesign, hearts, photography, Valentine's Day

If you follow me on Instagram, AllSparkledUpDesign, you know I’m posting A Month of Hearts. Today is Day 14 and there are 14 days of hearts to go! Here are the hearts I’ve posted so far. Make sure you check instagram so you can read all the captions that go with these photos. Love to you all!

1

1-peach-valentine-box-6144

Pink Lace candy box

2

Candle-lit heart

Candle-lit heart

3

Real, edible, miniature chocolates.

Real, edible, miniature chocolates.

4

Mercury glass heart and pearls.

Mercury glass heart and pearls.

5

Beaded Heart, neat and tidy

Beaded Heart, neat and tidy


Beaded Heart, wild and unkempt

Beaded Heart, wild and unkempt

6

Circuitry Heart

Circuitry Heart

7

Welded Heart

Welded Heart

8

Tiny Raggedy Ann and Andy

Tiny Raggedy Ann and Andy


Tiny Raggedy Ann with her ILY heart

Tiny Raggedy Ann with her ILY heart

9

Vintage Valentines

Vintage Valentines

10

Ribbon Flower velvet candy box.

Ribbon Flower velvet candy box.

11

Silk Ribbon Embroidered heart box.

Silk Ribbon Embroidered heart box.

12

Stone and Crystal Heart.

Stone and Crystal Heart.

13

Pink Ribbon Flowers.

Pink Ribbon Flowers.

14 Happy Valentine’s Day!

Two swans heart.

Two swans heart.

Share this:

  • Click to share on Twitter (Opens in new window)
  • Click to share on LinkedIn (Opens in new window)
  • Click to share on Facebook (Opens in new window)
  • Click to share on Pinterest (Opens in new window)
  • Click to share on Reddit (Opens in new window)
  • Click to email a link to a friend (Opens in new window)
  • Click to print (Opens in new window)
  • Click to share on Tumblr (Opens in new window)

Like this:

Like Loading...

I made fabric from photos of my carvings

01 Saturday Oct 2016

Posted by Julia Monroe in fabric, home decor, projects, sewing, Spoonflower, woodwork

≈ 3 Comments

Tags

carving, fabric, fabric design, floral, sewing, Spoonflower, woodwork

If you’ve been following my Instagram feed here, https://www.instagram.com/juliaamonroe/, you can see the progress I’m making carving wood panels for a terrarium.

Before assembling the carved wood panels into a terrarium base, I thought they would make a nice striped fabric so I took photographs of the panels and created a seamless, railroaded Floral Wood Carving Stripe fabric design. The design repeat is a little over a yard. You can find the fabric here on Spoonflower.

Fabric design from photographs of the carvings I'm making for a terrarium base.

Fabric design from photographs of the carvings I’m making for a terrarium base.

Close up of carving detail printed on fabric.

Close up of carving detail printed on fabric.

Another close up of the carved fern section.

Another close up of the carved fern section.

The Floral Wood Carving Stripe also makes a great gift wrap.
It’s available as wallpaper too.

The design is railroaded, with a repeat a little over a yard.

The design is railroaded, with a repeat a little over a yard.

I’m looking forward to making pillow covers from this fabric. They will look so nice outside on the deck. Or I might make cushions for the deck rocking chairs. Hmm, that will be a hard decision!

Floral Wood Panel Fabric

Floral Wood Panel Fabric

Share this:

  • Click to share on Twitter (Opens in new window)
  • Click to share on LinkedIn (Opens in new window)
  • Click to share on Facebook (Opens in new window)
  • Click to share on Pinterest (Opens in new window)
  • Click to share on Reddit (Opens in new window)
  • Click to email a link to a friend (Opens in new window)
  • Click to print (Opens in new window)
  • Click to share on Tumblr (Opens in new window)

Like this:

Like Loading...

The Snow and Crystal Tree and Tendril Snowflakes

20 Wednesday Jan 2016

Posted by Julia Monroe in allsparkledup, Christmas, crafts, DIY, home decor, projects, sparkling

≈ 2 Comments

Tags

Christmas, Christmas decorating, DIY, home decor, nature crafts, snowflakes, tree, tutorial

I put away all the Christmas decorations except for one – the Snow and Crystal Tree. The corner will be too empty if I put it away and I love the wintery look of it. The snowflakes remind me of scribbles. Scribble Snowflakes!

Snow and Crystal Tree, with vintage chandelier crystals and snowflakes made from dried vine tendrils.

Snow and Crystal Tree, with vintage chandelier crystals and snowflakes made from dried vine tendrils.

The tree is a dried branch cut from a tree in the woods behind our house. I stuck it firmly into Styrofoam in an urn and laid moss around the base.
The crystals are from the old chandelier that used to hang in my parents’ dining room when I was a child. I loved that chandelier so I’m thrilled to have some of the crystals from it.
The snowflakes are made of natural tendrils and curls that I collected from the vines in the backyard in the fall.  My granddaughter helped me look for the curly tendrils and we really enjoyed our time together outdoors.

Dried vine snowflakes, little 1" glass ball ornaments and vintage chandelier crystals.

Dried vine snowflakes, little 1″ glass ball ornaments and vintage chandelier crystals.

To make the snowflakes, I broke off the dry twigs and slid the curly tendrils off. Here is a photo I posted on instagram of the twig bits with the tendrils removed.

The tendrils were gently twisted and pulled off the broken twigs.

The tendrils were gently twisted and pulled off the broken twigs.

Each snowflake needed six similar pieces so I grouped the tendrils by size.
3 Snow Crystal Tree
Once I had six similar tendrils, I trimmed the ends so they were the same length.
4 Snow Crystal Tree
For each snowflake, I made a contoured mat out of foil for gluing. A small bead was glued temporarily on the back of the foil so it would create a small mound on the right side.
5 Snow Crystal Tree

The foil is gently pressed down around the bead to create a little mound.

The foil is gently pressed down around the bead to create a little mound.

On the right side of the foil, on top of the tiny mound, I glued a small bead for the center of the snowflake. All the tendrils will then be glued to this bead using hot glue.
7 Snow Crystal Tree
The tendrils were arranged around the center bead in a pleasing manner.
8 Snow Crystal Tree
The two straightest tendrils were glued on first, opposite each other, to create the line of symmetry.
9 Snow Crystal Tree
The other tendrils were glued on the sides and the hot glue was allowed to harden.
10 Snow Crystal Tree
To remove the delicate snowflake, the foil was folded and pinched together under the snowflake. Then the snowflake was gently popped off the foil. One of the snowflakes stuck too much so I used tweezers to pull the foil off and reglue the tendrils that had loosened.
11 Snow Crystal Tree
12 Snow Crystal Tree
The snowflakes were hung with thin hooks I made from jewelry wire.
13 Snow Crystal Tree
14 Snow Crystal Tree
15 Snow Crystal Tree
The vintage crystals look lovely on the tree.

Vintage hand-cut crystals adorn the tree.

Vintage hand-cut crystals adorn the tree.

17 Snow Crystal Tree
18 Snow Crystal Tree
At the base of the urn is a gilded tea cup filled with little glass ball ornaments.

The beautiful earthy and neutral color ornaments were from Terrain. The tea cup is from Anthropologie.

The beautiful earthy and neutral color ornaments were from Terrain. The tea cup is from Anthropologie.

Snow and Crystal Tree, with vintage chandelier crystals and snowflakes made from dried vine tendrils.

Snow and Crystal Tree, with vintage chandelier crystals, glass balls in neutral shades and snowflakes made from dried vine tendrils.

The little fox ornament I got several years ago finally found a home… at the base of the Snow and Crystal tree.

A furry, little red fox ornament sits at the base of the Snow and Crystal Tree.

A furry, little red fox ornament sits at the base of the Snow and Crystal Tree.

I don’t know what to put in the corner when this tree comes down.. probably a lamp. But then again, perhaps I’ll make a Snowy Valentine tree…

Share this:

  • Click to share on Twitter (Opens in new window)
  • Click to share on LinkedIn (Opens in new window)
  • Click to share on Facebook (Opens in new window)
  • Click to share on Pinterest (Opens in new window)
  • Click to share on Reddit (Opens in new window)
  • Click to email a link to a friend (Opens in new window)
  • Click to print (Opens in new window)
  • Click to share on Tumblr (Opens in new window)

Like this:

Like Loading...

Pearl Bottle Brush Topiary

13 Wednesday Jan 2016

Posted by Julia Monroe in allsparkledup, Christmas, crafts, DIY, home decor, New Years, On my Worktable, projects, tutorial

≈ Leave a comment

Tags

bottle brush tree, Christmas, Christmas decoration, crafts, home decor, pearls

I’ve made a decision!

Last year I was committed to posting timely topics on my blog. Well that didn’t happen! sigh. I don’t know how other bloggers do it all. They must decorate for Christmas months before December, the same way magazines work on their seasonal material many months before the issue hits the press.

Though I really tried last year, if I couldn’t finish a post during the season, I ended up never posting at all. That is going to change. This year, I am posting anything I want, any time I want. I have quite a bit of material to post! I know that breaks blogger rules, the rule that says readers won’t be interested in seeing Christmas crafts in August. But life is too short and much too busy so I hope you all forgive me for diving right in to this new year.

You will be getting more posts from me but it’s fairly certain they won’t be all calendar-tidy. Nope. Not at all. I can sorta-kinda-maybe get some posts matched with seasons but I won’t stress about missing. And I’ll do my best to not apologize when I post Christmas in May and Valentines in September. Because… it’s highly likely I will actually be working on Christmas projects in May and making Valentines in September!

So here’s a project I just finished yesterday, January 12, 2016. It’s a Christmas decoration. Happy New Year to you!

Pearl Bottle Brush Tree Topiary, made by cutting bristles out of a bottle brush tree and gluing on pearls.

Pearl Bottle Brush Tree Topiary, made by cutting bristles out of a bottle brush tree and gluing on pearls.

The photos are a bit off in tone because I started this Pearl Bottle Brush Topiary Tree before Thanksgiving 2015 and photographed the steps under various lighting conditions as I did them, weeks apart. That’s how I get so much done. Projects are broken down into phases, kept in bins and boxes like a kit, ready for me to work on here and there.

For the bottle brush topiary, I picked a nice bottle brush tree to work with. The brush had to be full and evenly distributed all the way around and the bristles had to be tight. I found these 9″ trees at Michaels.

The first step was establishing the spiral by sticking masking tape around the tree. I started at the base and wound it around the tree all the way to the top.

The masking tape is wound around the tree, starting at the bottom and spiraling around the tree to the top. The tape will mark all the places that the bristles will NOT be cut.

The masking tape is wound around the tree, starting at the bottom and spiraling around the tree to the top. The tape will mark all the places that the bristles will NOT be cut.

I first started cutting out the bristles right in the center of the taped areas as shown here. The first cutting was in the center between the tape, all the way from the base to the top of the tree.
3 Pearl Bottle Brush Topiary
Here you can see what the tree looks like after the first cutting.
4 Pearl Bottle Brush Topiary
To make the second cutting, I cut at an angle from the tape in to meet the deep first cut in the center of the tree.

Cutting at an angle from the tape to the center. The tree was turned upside down to make cuts under the spiral as you can see here.

Cutting at an angle from the tape to the center. The tree was turned upside down to make cuts under the spiral as you can see here.

After the second cutting.
6 Pearl Bottle Brush Topiary
I continued cutting away bristles until there was a nice, neat spiral shape, all between the tape-covered bristles.
7 Pearl Bottle Brush Topiary
The cutting is all finished here.
8 Pearl Bottle Brush Topiary
The masking tape is gently pulled away.

I was so happy with how easy it was to make the spiral shape!

I was so happy with how easy it was to make the spiral shape!


10 Pearl Bottle Brush Topiary
11 Pearl Bottle Brush Topiary
Here is the cut tree next to an identically-taped bottle brush tree. The tape makes it easy to cut an even spiral.
12 Pearl Bottle Brush Topiary
13 Pearl Bottle Brush Topiary
The last step was gluing on the pearly glass and plastic beads. I watched Downton Abbey while doing this and it was a pleasant task. Oh so elegant! I used Fast Grab Tacky Glue and tweezers to place each pearl. No other glue would have been as easy to use because I needed a glue that grabbed fast and didn’t drip. I used two kinds of large pearl beads and a couple different kinds of smaller pearls and pearly beads.

Pearls are glued to the tips of bristles on this Bottle Brush Topiary Tree.

Pearls are glued to the tips of bristles on this Bottle Brush Topiary Tree.

I’m looking forward to displaying this pretty tree next Christmas, tucked amongst the plants in the corner of the dining room.

Pearl Bottle Brush Topiary Tree

Pearl Bottle Brush Topiary Tree

By the way, did you see the beautiful red Poinsettia peeking over in the first photo? When I lifted the poinsettia plant out of the van in early December, three branches broke off. So I stuck them in a glass of water. They are still beautiful, over a month later. =)

Share this:

  • Click to share on Twitter (Opens in new window)
  • Click to share on LinkedIn (Opens in new window)
  • Click to share on Facebook (Opens in new window)
  • Click to share on Pinterest (Opens in new window)
  • Click to share on Reddit (Opens in new window)
  • Click to email a link to a friend (Opens in new window)
  • Click to print (Opens in new window)
  • Click to share on Tumblr (Opens in new window)

Like this:

Like Loading...

Pencil Rolls and Coloring Pages

04 Monday Jan 2016

Posted by Julia Monroe in All Sparkled Up, art, Christmas, color, crafts, DIY, fabric, On my Worktable, photography, projects, Spoonflower, tutorial

≈ Leave a comment

Tags

colored pencils, coloring, coloring books, DIY, fabric, pencil roll, photography, sewing, Spoonflower, tutorial

I hope you all had a wonderful Christmas and New Year’s. We did!

I made the girls Pencil Rolls and custom coloring pages for Christmas. They loved the sets.

Colored Pencil Roll

Colored Pencil Roll

Pencil roll with special coloring pages

Pencil roll with special coloring pages

I used Julie 1971 fabric from Spoonflower.

Julie 1971, a fabric featuring houses made of felt, is available on Spoonflower.

Julie 1971, a fabric featuring houses made of felt, is available on Spoonflower.

The inspiration for Julie 1971 is a piece of artwork I made when I was 12 years old, in 1971. I made the little felt houses from bits of felt and glued them to the back of a piece of laundry detergent box cardboard.
6 Felt Houses Inspiration
The pencil roll was very easy to make. The lining, pocket and flap are linen, the decorative cover wrap is cotton canvas.
7 Felt Houses

Felt Houses

Felt Houses

Even after all these years, the cardboard is still in great shape.

The back of the Felt Houses artwork, clued to a piece of cardboard from a box of All laundry detergent.

The back of the Felt Houses artwork is cardboard cut from a box of All laundry detergent.

My father cut the picture frame from a single piece of wood. The Felt Houses art hangs in our guest room.
5 Felt Houses and fabric
The original artwork is still vibrant and prints beautifully on canvas and linen fabrics from Spoonflower. Here you can see the original art next to canvas, which I have aged a little by machine washing it in warm water.

The pencil roll open, with flap folded over to protect pencil tips and keep the pencils from spilling out during transport.

The pencil roll open, with flap folded over to protect pencil tips and keep the pencils from spilling out during transport.

Outer cover – made of a piece of decorative Julie 1971 fabric 17″ x 8.5″, sewed to a piece of linen 17″ x 4.5″ for the flap, to make a rectangle 17″ x 12.5″.

The outside of the pencil roll, with the flap open.

The outside of the finished pencil roll, with the flap open.

Lining – made of linen cut to 17″ x 12.5″.
Pencil pocket – two pieces of linen 17″ x 4″.

The cover piece with flap was sewn to the lining piece, right sides together, with a small opening for turning at the bottom. This cover piece was turned right side out and pressed flat.

The pencil pocket was made by stitching the two 17″ x 4″ pieces of linen together with a small opening for turning at the bottom. This piece was turned right side out and pressed flat.

The pocket piece was sewn to the bottom of the cover piece. Here you can see how simple the pocket is attached to the cover piece.

The pocket piece was stitched inside the cover piece at the sides and along the bottom.

The pocket piece was stitched inside the cover piece at the sides and along the bottom.

To figure out where to stitch for the pencil pockets, I simply stuck pieces of masking tape vertically, all across the pocket piece, with a little margin between each piece of tape, and stitched between the pieces of masking tape. Several of the pockets weren’t exactly the same size but that was fine. That method of marking for the pockets was super easy and didn’t need any measuring or marking the fabric at all.

To keep the roll shut, I used what I had on hand – stretchy beading elastic tied in a loop.

For each girl, I made a custom set of pictures to color. I used Photoshop to alter photographs and printed the coloring pages on cardstock.

Some of the coloring pages I gave to the girls.

Some of the coloring pages I gave to the girls.

Boxes for pencils are nice, but there is another layer of artsy satisfaction when you unfurl a roll of creamy pencils tucked in soft linen.

Coloring with pencils

Coloring with pencils

Here are two free coloring pages for you keep and print out.

Free coloring page - Do what is Beautiful and Never Give Up

Free coloring page – Do what is Beautiful and Never Give Up

Girl with Flowers in her Hair - a free coloring page for you!

Girl with Flowers in her Hair – a free coloring page for you.

Enjoy!

Share this:

  • Click to share on Twitter (Opens in new window)
  • Click to share on LinkedIn (Opens in new window)
  • Click to share on Facebook (Opens in new window)
  • Click to share on Pinterest (Opens in new window)
  • Click to share on Reddit (Opens in new window)
  • Click to email a link to a friend (Opens in new window)
  • Click to print (Opens in new window)
  • Click to share on Tumblr (Opens in new window)

Like this:

Like Loading...

Latte Magnets for the Water Counter

24 Friday Jul 2015

Posted by Julia Monroe in All Sparkled Up, crafts, DIY, On my Worktable, projects, tutorial

≈ Leave a comment

Tags

crafts, DIY, health, magnets, refrigerator art, tutorial, water

“Did you drink anything today?”
“Yes… I think I did… I had a cup of coffee… maybe two…”
“Any water?”
One of my sons is keen on proper water consumption and I really appreciate his healthy diligence.

I keep a Water Counter on the refrigerator. You can check out the tutorial here.

To help curb my coffee intake, I made two Latte Magnets. From now on, it’s two cups of coffee a day max. Coffee is no substitute for water. In fact, caffeine actually dehydrates you and flushes fluid. So for each cup of coffee you drink, drink one or more cups of water to stay hydrated.

The magnets were first coated with gold acrylic paint.

The magnets are painted with gold acrylic paint.

The magnets are painted with gold acrylic paint.

Here you can see the finished magnets, as well as my test painting right on the tray.

For the test, I made a puddle of gold acrylic paint on the paint tray. Immediately after that, while the paint was wet, I used the tip of a toothpick to lightly dab on blobs of white gesso. The gesso was carefully dabbed on top of the wet gold paint, not mixed in. Then I used a toothpick to draw through the gesso and gold paint to make the design. The test worked great so I did the same thing on the magnets and let them dry overnight.

To make the design, I dabbed on two small blobs of white right next to each other for the heart and long thin “smilies” under, for the leaves. It only took one sweep of the toothpick down through the center to make the design.

White gesso is dabbed on a puddle of gold acrylic paint. A toothpick dragged down through the center of the wet paint creates the cute Latte design.

White gesso is dabbed on a puddle of gold acrylic paint. A toothpick dragged down through the center of the wet paint creates the cute Latte design.

Little Latte Magnets.

Little Latte Magnets.

Now when the water counter on the refrigerator just has two cups of coffee in it… that means drink more water!

Plastic wine glass Water Counter on my refrigerator with water, juice/wine and Latte Magnets. Today it's one glass of juice, one cup of coffee and two glasses of water... need more water

Plastic wine glass Water Counter on my refrigerator with water, juice/wine and Latte Magnets. Today it’s one glass of juice, one cup of coffee and two glasses of water… need more water.

Share this:

  • Click to share on Twitter (Opens in new window)
  • Click to share on LinkedIn (Opens in new window)
  • Click to share on Facebook (Opens in new window)
  • Click to share on Pinterest (Opens in new window)
  • Click to share on Reddit (Opens in new window)
  • Click to email a link to a friend (Opens in new window)
  • Click to print (Opens in new window)
  • Click to share on Tumblr (Opens in new window)

Like this:

Like Loading...

On my Worktable… continuing teacup cross stitch and embroidery

04 Wednesday Feb 2015

Posted by Julia Monroe in art, crafts, On my Worktable, projects, tea time, words

≈ 1 Comment

Tags

crafts, cross stitch, embroidery, On my worktable, projects, teacups

Cross stitch nearly finished. The words will be embroidered. Then adding more embroidery and seed beads will be the really fun part.

Cross stitch nearly finished. The words will be embroidered. Then adding more embroidery and seed beads will be the really fun part.

Share this:

  • Click to share on Twitter (Opens in new window)
  • Click to share on LinkedIn (Opens in new window)
  • Click to share on Facebook (Opens in new window)
  • Click to share on Pinterest (Opens in new window)
  • Click to share on Reddit (Opens in new window)
  • Click to email a link to a friend (Opens in new window)
  • Click to print (Opens in new window)
  • Click to share on Tumblr (Opens in new window)

Like this:

Like Loading...

Dessert Tea

15 Wednesday Oct 2014

Posted by Julia Monroe in All Sparkled Up, baking, birthday, family, food, party, projects, tea time

≈ 3 Comments

Tags

All Sparkled Up, baking, dessert, dessert table, food, party, Rosanna, tablescape, tea time

The timing was right… It was Rosanna’s 8th Annual Tablescape Contest, my daughter-in-law’s birthday, and I was finally healed enough to tackle an ambitious baking event. What better way to celebrate all three than with a Dessert Tea!

1 Dessert Table

Dessert Tea table setting

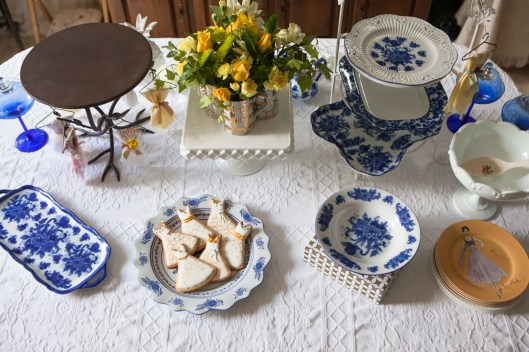
Here is the table before I started adding all the desserts. I made the tablecloth from an old bedspread with fringed edge. (You can see scraps from that old tattered bedspread in the photos of Tea by the Sea. Crafters don’t waste any scrap. Ha!)

I adore Rosanna’s style and was hoping to enter her 2013 tablescape contest last summer. But we didn’t get the remodel done in time and I wasn’t very mobile back then. The china cabinet was emptied so we could move it around and all the china was stacked on two tables in the living room. That’s when I got the idea for a blue and white and yellow theme for a table.

This year, I thought about the Dessert Table theme for weeks. Each time I got an idea, I added it to my notes.
2 Dessert Tea notes

4 Dessert Tea Centerpiece

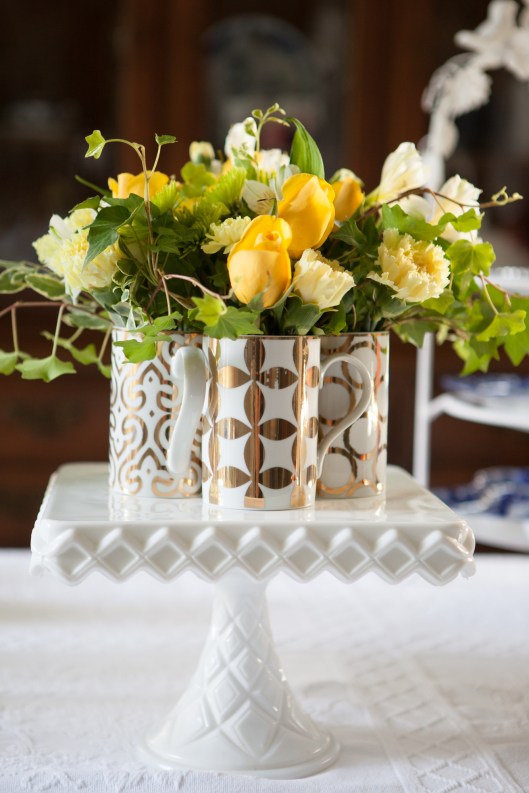
Four elegant mugs on a dessert pedestal hold the floral centerpiece.

After I decided on the serving dishes, I wrote a list of tasks, desserts and a tentative baking schedule.
3 Dessert Tea schedule
There were two main focal points for the table, Rosanna’s elegant Luxe Moderne mugs for the centerpiece, and her La Mode fashion plates.
I used four of Rosanna’s mugs on a vintage dessert pedestal to make the centerpiece. I was so excited about this design. It has a lot of potential and I plan on using four mugs as a centerpiece base for other tablescapes.

Sugar cookies were painted following Rosanna’s designs on her mugs. I wrote about the cookies here. It was challenging to paint the designs! I have new respect for Rosanna’s design skill.
5 Gilded dress cookies
The fashion plates are so pretty!
6 Rosanna Inc La Mode plates

7 Napkins hung like little dresses

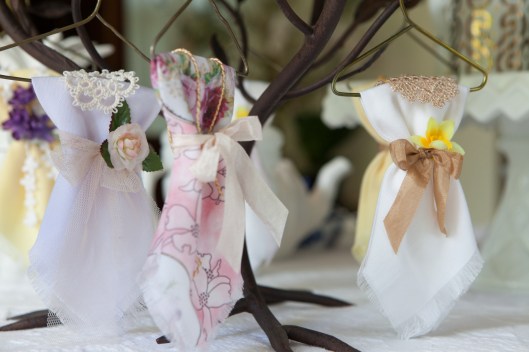
These are not dresses, they are napkins! Small squares of fabric folded are diagonally and draped over a miniature hanger. A bit of ribbon and trim… and you have sweet petite dresses!

9 Tiered server with various trays

This server was made to accommodate round plates. But rectangle platters made for more interest.


This tiered server used to be bright red, yellow and blue but I painted it all white with acrylic paint. Instead of using round plates on the server, I used two rectangle trays on the bottom. It looked great!

12 Layered desserts

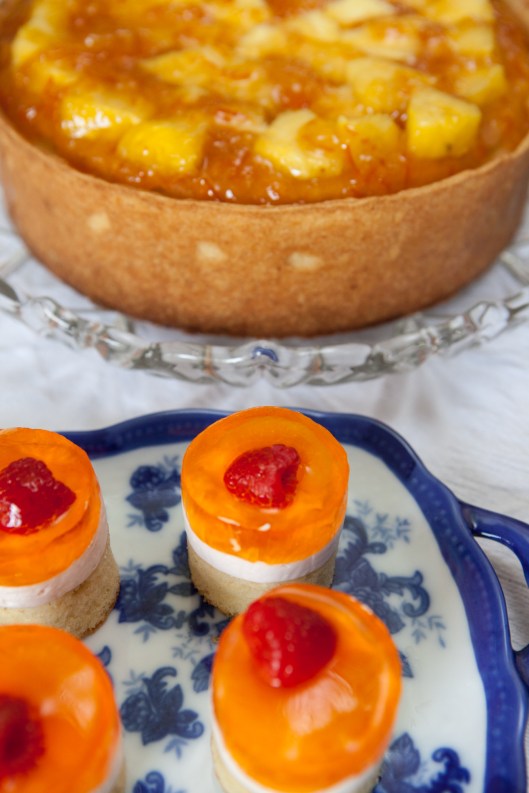
Dessert Tea – Layered Desserts with Vanilla Bean Cake, Raspberry Mousse and Orange Gelatin with Raspberry and Mandarin Orange Slice.

To continue the fashion theme, I cut 6″ to 8″ squares of fabric for petite tea napkins and fringed the edges. Each napkin was folded and draped over hangers to look like dresses. Most were folded diagonally. Each was tied at the “waist” with ribbon, a little flower tucked in the waist and a small piece of trim was draped over the top to look like a collar.

I made the miniature hangers from pieces of coat hanger cut with wire cutters. One coat hanger made three miniature hangers. The metal cake stand was perfect from which to hang the napkin dresses.
8 Little coat hangers

The tea service was on the back of the table, behind the desserts. I wrote how I made the Sugar Bonnets here.
10 Dessert Tea tea service
On the tiered server, top to bottom: Spritz, squares of Fudge and Shortbread, Butter Cookie Dresses.
11 Dessert on three tiers
I experimented with a new baking pan to make the Layered Desserts. They were delicious and so pretty! I will post the recipe some time.

The Layered Desserts looked perfect on the long rectangular tray.
13 Layered desserts
I also made a Lemon Orange Cheesecake topped with Pineapple and a Marmalade Glaze. So delicious!
14 Pineapple Orange Cheesecake

16 Cherry Tarts

Dessert Tea – I didn’t have time to make round pastry shells. It was quick and easy to cut squares with a pizza cutter and place the pie pastry in the tart pan.

19 Dessert table

Dessert Tea – a table set with a delicious assortment of desserts: Layered Desserts, White Chocolate Praline Cake, Pineapple Marmalade Cheesecake, Cherry Tarts, Spritz Cookies, Fudge, Scottish Shortbread, Butter Dress Cookies, Chocolate Cupcakes with Caramel Macadamia Frosting, Honeydew Melon Balls with Blueberries and a bowl of Cherries.

20 Fabric napkin folded to look like a dress on a hanger

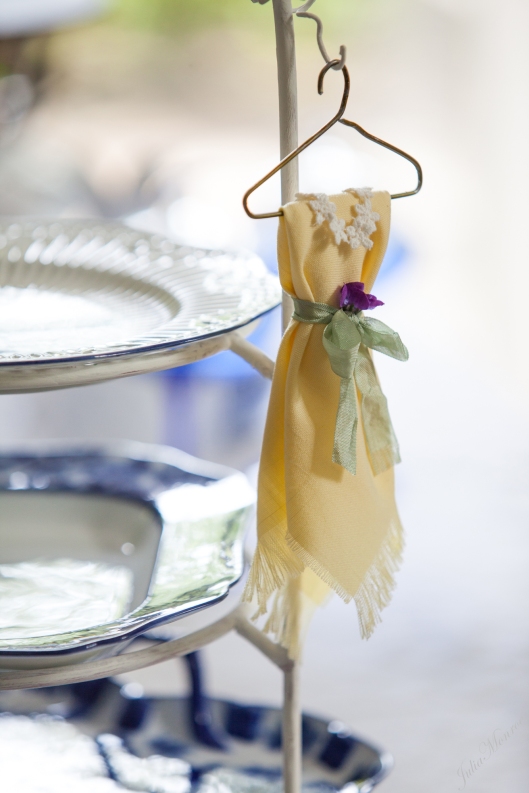
Dessert Tea – napkins folded diagonally and hung on a miniature hanger, tied with ribbon and draped with lace.

Two bowls held Honeydew Melon balls and Blueberries and Cherries, garnished with fresh mint.
15 Fresh cherries honeydew melon and blueberries
Cherry Tarts were on a glass dish.

I only had four covered glass dishes but that was enough to place four Chocolate Cupcakes with Caramel and Macadamia Frosting.
17 Chocolate Cupcakes with Caramel Macadamia Frosting
The birthday cake was a White Chocolate Praline Cake with homemade Strawberry Raspberry Jam topping.
18 White Chocolate Praline Cake
All together, the table looked lovely and the event was a huge success!

I submitted my photos and won an honorable mention in the tablescape contest… happy face! =)
My daughter-in-law was thrilled with her birthday, the girls loved the dress napkins and all our guests enjoyed the delicious desserts.
And it was the perfect event to celebrate the return of my health and stamina after such a long recovery. A sweet day indeed!

Share this:

  • Click to share on Twitter (Opens in new window)
  • Click to share on LinkedIn (Opens in new window)
  • Click to share on Facebook (Opens in new window)
  • Click to share on Pinterest (Opens in new window)
  • Click to share on Reddit (Opens in new window)
  • Click to email a link to a friend (Opens in new window)
  • Click to print (Opens in new window)
  • Click to share on Tumblr (Opens in new window)

Like this:

Like Loading...
← Older posts

If you are a non-WordPress follower, enter your email address to follow this blog and receive notifications of new posts by email.

Tags

allsparkledup All Sparkled Up altered book art baking beach beads bird bread breakfast cake candy carving cat cats chocolate Christmas Christmas tree cookies craft crafts dessert DIY Easter Easter eggs eggs egg tree encouragement fabric family figs flowers food funny gardening Gilded Girls God granddaughter grandkids heart home decor hope inspiration inspirational jewelry jewelry making joconde light Little Plastic Bears miniature miniatures mixed media mousse nature painting PB & J pets photo photography projects recipe roses salad Scoliosis scripture sewing snow sparkling Spoonflower sunlight sunset Sunset Beach surgery tablescape tea tree tutorial Valentine's Day vintage book words

Archived Posts

Top Posts & Pages

Sourdough Breadstick Cobras
A Welded Valentine!
Marble window sills
Sugar Bonnets
BFN Day - To the Third Neighbor I gave Sourdough Grain Bread

Recent Posts

  • Sfogliatelle
  • Blue Willow Toile
  • The Kitchen tea towel
  • The little cake she decorated
  • Icing flowers
  • Matthew 11:28
  • Christmas at Sea Tablescape
  • Gratitude
  • The Hot Air Balloon mobile has lights
  • Journaling in Coloring Books
  • The Light is still here.
  • A Hot Air Balloon decoration for my granddaughter’s room
  • Coco’s new favorite hangout
  • My kitten is growing
  • English roses fabric

Post Categories

All Sparkled Up allsparkledup altered books American Girl Dolls art baking Baking for Neighbors ballet beach beading BFN birthday books cake decorating calligraphy candy cats Christmas color community cooking Craft Fail crafts DIY dolls drawing Easter encouragement Etsy fabric family fashion design Favorite Childhood Books flowers food Free Idea funny gardening Gilded Girls Gilded Life God granddaughter grandkids handmade books holiday home home decor Inspirational jewelry making journals lighting Little Plastic Bears Mexican miniature mixed media music nature New Years On my Worktable painting party pets photography Princess doll projects recipe Scoliosis Scripture sewing sketchbook sparkling Spoonflower sunlight sunset tea time Thanksgiving The cats time tools travel tutorial Uncategorized Valentine's Day water wedding woodwork words wreath
Follow All Sparkled Up on WordPress.com

Blog at WordPress.com.

Privacy & Cookies: This site uses cookies. By continuing to use this website, you agree to their use.
To find out more, including how to control cookies, see here: Cookie Policy
  • Follow Following
    • All Sparkled Up
    • Join 289 other followers
    • Already have a WordPress.com account? Log in now.
    • All Sparkled Up
    • Customize
    • Follow Following
    • Sign up
    • Log in
    • Report this content
    • View site in Reader
    • Manage subscriptions
    • Collapse this bar
 

Loading Comments...
 

    %d bloggers like this: