• About

All Sparkled Up

~ Like dew hanging from the tip of a leaf, a single bead or word adds sparkle where there was none. BE the bright!

All Sparkled Up

Category Archives: Christmas

Christmas at Sea Tablescape

23 Saturday Dec 2017

Posted by Julia Monroe in All Sparkled Up, baking, Christmas, crafts, DIY, family, holiday, home, home decor, Uncategorized

≈ 4 Comments

Tags

Christmas table, home decor, lunch, tablescape, toy ship

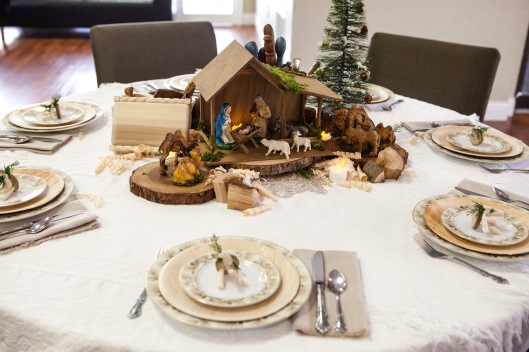
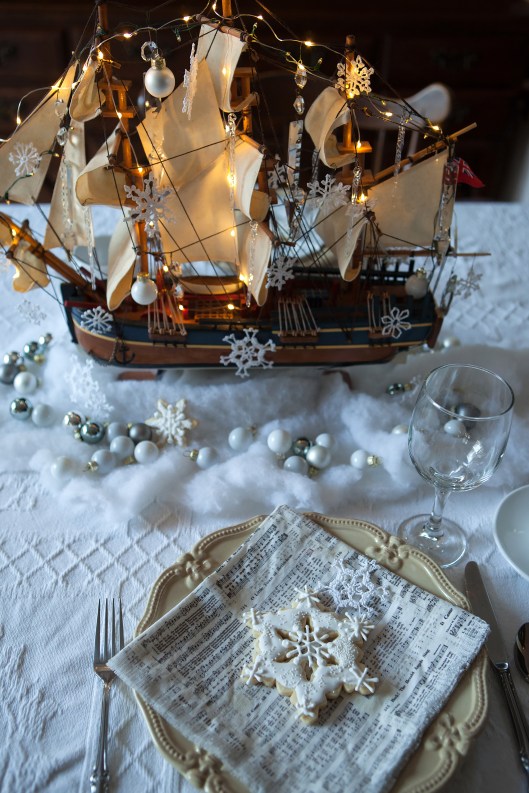
I hosted a Christmas Lunch for two of my daughters-in-law. The tablescape was Christmas at Sea, which featured an old ship that belonged to my dear father-in-law. I love the Christmas song “I Saw Three Ships Come Sailing in on Christmas Day” and that was the original inspiration for the table. I would need smaller ships to fit three on the table though so one ship was big enough. One of my daughters-in-law used to work on a cruise ship so the theme was all the more fun.
1 Christmas at Sea tablescape-0474
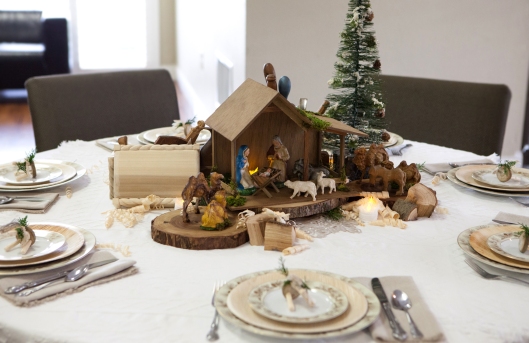
The ship was placed on a piece of fluffy white batting in the center of the table. Small glass balls in white and wintery shades of gray were scattered like bubbles around the ship.
2 Christmas at Sea tablescape-0476
Small crocheted snowflakes were hung from the ship’s sails.
3 Christmas at Sea tablescape-0490
I also hung several glass balls and glass icicles and chandelier prisms from the ship to add to the wintery icy effect.
4 Christmas at Sea tablescape-0487
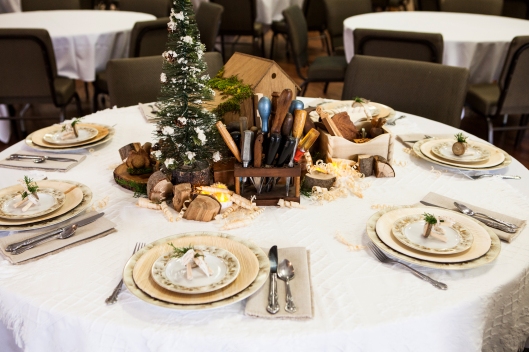
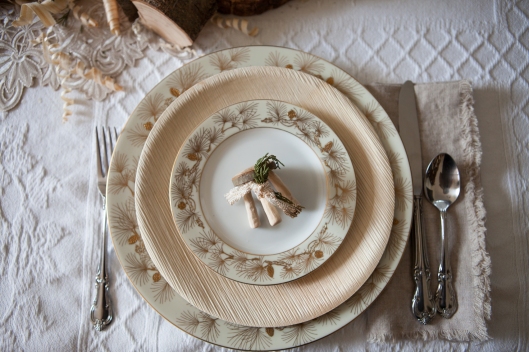
The napkins were made from Vintage Christmas Carol sheet music fabric from Spoonflower. I had the design printed on Linen Cotton Canvas and it made lovely napkins.
5 Christmas at Sea tablescape-0483
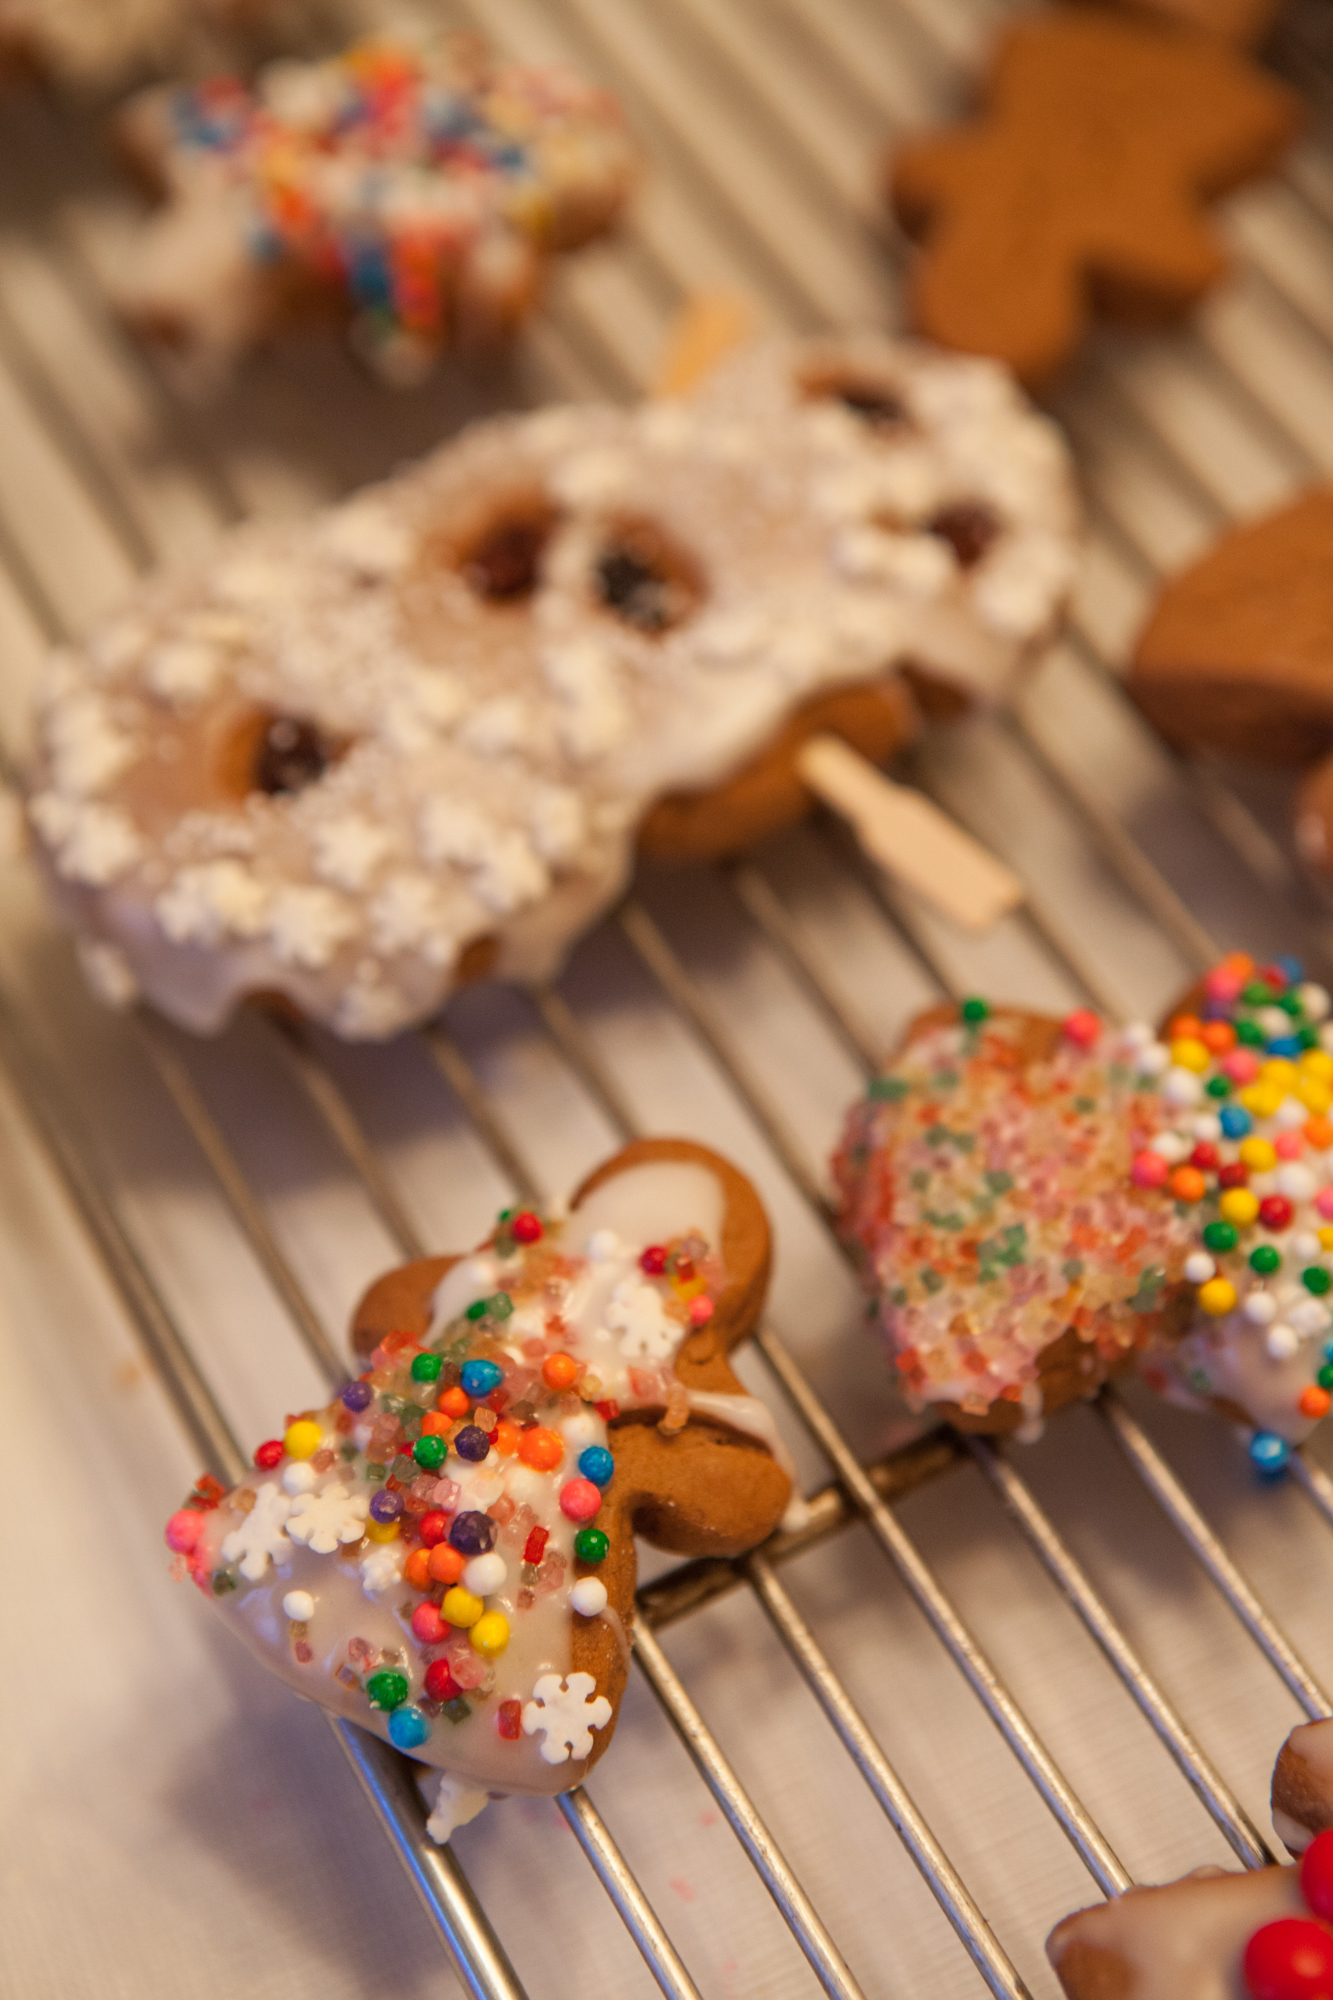
On each napkin I placed a sugar cookie snowflake. They turned out pretty but are so fragile that I broke the royal icing on several even before the lunch! But I adore snowflakes so I’ll probably make these again, even if they do break easily.
6 Christmas at Sea tablescape-0485
Several of the smaller snowflake cookies were placed around the ship.
7 Christmas at Sea tablescape-0486
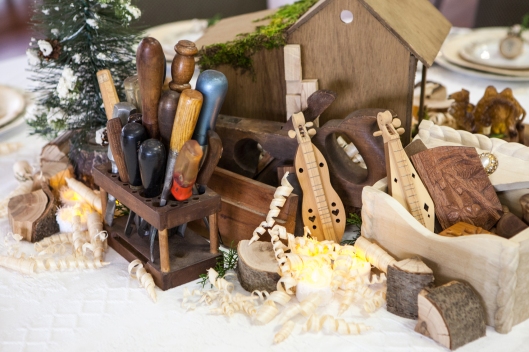
To light the ship, I used three strands of tiny, battery operated lights. The battery boxes fit perfectly under the ship and were hidden under the white batting.
8 Christmas at Sea tablescape-0484
Lunch was Potato Bacon Chowder, Ham Barbecue Rolls, Spinach Salad, and Cranberry Cheesecake Pie for dessert. We were sad that one of the girls couldn’t make it due to a sore throat. But now I have a good excuse to host again. It was too fun to only do once. Instead of Christmas at Sea, it will be Winter at Sea!
9 Christmas at Sea tablescape-0480
I wish we had a fireplace mantel in the living room. I’d love to style ships like this on a mantel. If you do, please post in the comments and share. I’d love to see it!
10 Christmas at Sea tablescape-0489


Share this:

  • Click to share on Twitter (Opens in new window)
  • Click to share on LinkedIn (Opens in new window)
  • Click to share on Facebook (Opens in new window)
  • Click to share on Pinterest (Opens in new window)
  • Click to share on Reddit (Opens in new window)
  • Click to email a link to a friend (Opens in new window)
  • Click to print (Opens in new window)
  • Click to share on Tumblr (Opens in new window)

Like this:

Like Loading...

THE Carpenter Christmas Tablescape

25 Sunday Dec 2016

Posted by Julia Monroe in All Sparkled Up, Christmas, community, Craft Fail, encouragement, family, Inspirational, Uncategorized

≈ 2 Comments

Tags

Christmas, Christmas tablescape, tablescape

Carpenter, as in not someone’s name, but rather the vocation. The wood worker that cuts down trees and uses sharp gouges to make houses and three-legged stools.

And not just any carpenter, but THE carpenter. Jesus could have been any profession in the world. But he was a worker of wood, a simple carpenter by trade. When I volunteered to do a tablescape for the Christmas brunch event at our church, the first thing I thought of was Christmas trees and wood, and how significant wood is in relation to Christmas and Jesus… and me.
1-christmas-wood-tablescape-front
2-christmas-wood-tablescape-1658
Jesus worked in a wood shop. He used logs and blocks of wood. He used saws and gouges.
3-christmas-wood-tablescape-tools-1657
At the end of a day he would have had the glorious smell of aromatic sawdust and curly wood shavings clinging to his garments.
4-christmas-wood-tablescape

As an apprentice, one of the first pieces of furniture he would have made would be a three-legged stool.

6-1-legged-stool

Three legged stools can sit firmly on uneven surfaces.

6-3-christmas-wood-tablescape-favor

And if one leg is a little longer than the other, the stool still works so it is the perfect beginner’s project for making furniture.
6-2-3-legged-stool
7-legged-stool-ornament

8-christmas-tablescape-setting
My dad enjoyed wood working as a hobby but he didn’t build furniture. He built his own house, he loved cutting down trees and chopping wood, and he loved carving.
9-dons-wood-carving
I learned to carve by watching him. “Never fight the grain of wood,” he quietly said. “Work with the grain, not against it. Take tiny cuts. You can’t put wood back but you can always cut away tiny bits. Take your time.”
10-dons-wood-carving
My father had incredible patience and I watched in silence as he made tiny cuts in the wood.
11-dons-wood-carving
12-dons-wood-carving
I was 22 when I married and moved away from home. All I learned about woodworking was during my childhood but I never forgot my father’s skill. My father passed away just a couple days before Christmas, two years ago. But instead of having the memory of his passing be something hard, it is beautiful this time of year. Because my father worked with wood and so did Jesus. My dad never got to see my carving. But somehow, I think he knows and is glad.
14-my-wood-carving-1772
15-my-wood-carving
Wood workers mark their tools and their woodwork. It’s called a “maker’s mark.” My dad carved his name into the gouges he made from nails.
16-dons-tools
17-dons-tools
18-dons-tools
He carved his name and date in his carvings.
20-dons-carving
He sometimes carved the location where he made his piece.
19-dons-carving
Jesus knew all the details of woodworking.
21-christmas-tablescape-details-1656
His first contact with wood was being laid in a wood manger, a feeding trough for animals. It was rustic and rough.
22-christmas-tablescape
As he grew, He learned how to shape wood and smooth wood, remove tiny bits to make something functional and beautiful. He knew which trees were strong, which had the best grain, which smelled aromatic. And he would have known about maker’s marks.

As I put together my Carpenter tablescape, I included two wood cross beams leaning against the back of the creche.
23-christmas-wood-tablescape
After spending a life working with wood, Jesus’ last contact with wood was being nailed to it.
24-christmas-wood-tablescape
And there, in the cross, was Jesus’ “maker’s mark”, the nail prints.
25-christmas-wood-tablescape
This Christmas, what is precious to you? To me, it is the memory of my dad, the wood carver.
26-dons-self-portrait-wood-carving
And being blessed with the ability to work with wood like my dad and Jesus, The Carpenter.
27-christmas-wood-tablescape-manger-1655
28-christmas-wood-tablescape

Save

Share this:

  • Click to share on Twitter (Opens in new window)
  • Click to share on LinkedIn (Opens in new window)
  • Click to share on Facebook (Opens in new window)
  • Click to share on Pinterest (Opens in new window)
  • Click to share on Reddit (Opens in new window)
  • Click to email a link to a friend (Opens in new window)
  • Click to print (Opens in new window)
  • Click to share on Tumblr (Opens in new window)

Like this:

Like Loading...

The Snow and Crystal Tree and Tendril Snowflakes

20 Wednesday Jan 2016

Posted by Julia Monroe in allsparkledup, Christmas, crafts, DIY, home decor, projects, sparkling

≈ 2 Comments

Tags

Christmas, Christmas decorating, DIY, home decor, nature crafts, snowflakes, tree, tutorial

I put away all the Christmas decorations except for one – the Snow and Crystal Tree. The corner will be too empty if I put it away and I love the wintery look of it. The snowflakes remind me of scribbles. Scribble Snowflakes!

Snow and Crystal Tree, with vintage chandelier crystals and snowflakes made from dried vine tendrils.

Snow and Crystal Tree, with vintage chandelier crystals and snowflakes made from dried vine tendrils.

The tree is a dried branch cut from a tree in the woods behind our house. I stuck it firmly into Styrofoam in an urn and laid moss around the base.
The crystals are from the old chandelier that used to hang in my parents’ dining room when I was a child. I loved that chandelier so I’m thrilled to have some of the crystals from it.
The snowflakes are made of natural tendrils and curls that I collected from the vines in the backyard in the fall.  My granddaughter helped me look for the curly tendrils and we really enjoyed our time together outdoors.

Dried vine snowflakes, little 1" glass ball ornaments and vintage chandelier crystals.

Dried vine snowflakes, little 1″ glass ball ornaments and vintage chandelier crystals.

To make the snowflakes, I broke off the dry twigs and slid the curly tendrils off. Here is a photo I posted on instagram of the twig bits with the tendrils removed.

The tendrils were gently twisted and pulled off the broken twigs.

The tendrils were gently twisted and pulled off the broken twigs.

Each snowflake needed six similar pieces so I grouped the tendrils by size.
3 Snow Crystal Tree
Once I had six similar tendrils, I trimmed the ends so they were the same length.
4 Snow Crystal Tree
For each snowflake, I made a contoured mat out of foil for gluing. A small bead was glued temporarily on the back of the foil so it would create a small mound on the right side.
5 Snow Crystal Tree

The foil is gently pressed down around the bead to create a little mound.

The foil is gently pressed down around the bead to create a little mound.

On the right side of the foil, on top of the tiny mound, I glued a small bead for the center of the snowflake. All the tendrils will then be glued to this bead using hot glue.
7 Snow Crystal Tree
The tendrils were arranged around the center bead in a pleasing manner.
8 Snow Crystal Tree
The two straightest tendrils were glued on first, opposite each other, to create the line of symmetry.
9 Snow Crystal Tree
The other tendrils were glued on the sides and the hot glue was allowed to harden.
10 Snow Crystal Tree
To remove the delicate snowflake, the foil was folded and pinched together under the snowflake. Then the snowflake was gently popped off the foil. One of the snowflakes stuck too much so I used tweezers to pull the foil off and reglue the tendrils that had loosened.
11 Snow Crystal Tree
12 Snow Crystal Tree
The snowflakes were hung with thin hooks I made from jewelry wire.
13 Snow Crystal Tree
14 Snow Crystal Tree
15 Snow Crystal Tree
The vintage crystals look lovely on the tree.

Vintage hand-cut crystals adorn the tree.

Vintage hand-cut crystals adorn the tree.

17 Snow Crystal Tree
18 Snow Crystal Tree
At the base of the urn is a gilded tea cup filled with little glass ball ornaments.

The beautiful earthy and neutral color ornaments were from Terrain. The tea cup is from Anthropologie.

The beautiful earthy and neutral color ornaments were from Terrain. The tea cup is from Anthropologie.

Snow and Crystal Tree, with vintage chandelier crystals and snowflakes made from dried vine tendrils.

Snow and Crystal Tree, with vintage chandelier crystals, glass balls in neutral shades and snowflakes made from dried vine tendrils.

The little fox ornament I got several years ago finally found a home… at the base of the Snow and Crystal tree.

A furry, little red fox ornament sits at the base of the Snow and Crystal Tree.

A furry, little red fox ornament sits at the base of the Snow and Crystal Tree.

I don’t know what to put in the corner when this tree comes down.. probably a lamp. But then again, perhaps I’ll make a Snowy Valentine tree…

Share this:

  • Click to share on Twitter (Opens in new window)
  • Click to share on LinkedIn (Opens in new window)
  • Click to share on Facebook (Opens in new window)
  • Click to share on Pinterest (Opens in new window)
  • Click to share on Reddit (Opens in new window)
  • Click to email a link to a friend (Opens in new window)
  • Click to print (Opens in new window)
  • Click to share on Tumblr (Opens in new window)

Like this:

Like Loading...

Pearl Bottle Brush Topiary

13 Wednesday Jan 2016

Posted by Julia Monroe in allsparkledup, Christmas, crafts, DIY, home decor, New Years, On my Worktable, projects, tutorial

≈ Leave a comment

Tags

bottle brush tree, Christmas, Christmas decoration, crafts, home decor, pearls

I’ve made a decision!

Last year I was committed to posting timely topics on my blog. Well that didn’t happen! sigh. I don’t know how other bloggers do it all. They must decorate for Christmas months before December, the same way magazines work on their seasonal material many months before the issue hits the press.

Though I really tried last year, if I couldn’t finish a post during the season, I ended up never posting at all. That is going to change. This year, I am posting anything I want, any time I want. I have quite a bit of material to post! I know that breaks blogger rules, the rule that says readers won’t be interested in seeing Christmas crafts in August. But life is too short and much too busy so I hope you all forgive me for diving right in to this new year.

You will be getting more posts from me but it’s fairly certain they won’t be all calendar-tidy. Nope. Not at all. I can sorta-kinda-maybe get some posts matched with seasons but I won’t stress about missing. And I’ll do my best to not apologize when I post Christmas in May and Valentines in September. Because… it’s highly likely I will actually be working on Christmas projects in May and making Valentines in September!

So here’s a project I just finished yesterday, January 12, 2016. It’s a Christmas decoration. Happy New Year to you!

Pearl Bottle Brush Tree Topiary, made by cutting bristles out of a bottle brush tree and gluing on pearls.

Pearl Bottle Brush Tree Topiary, made by cutting bristles out of a bottle brush tree and gluing on pearls.

The photos are a bit off in tone because I started this Pearl Bottle Brush Topiary Tree before Thanksgiving 2015 and photographed the steps under various lighting conditions as I did them, weeks apart. That’s how I get so much done. Projects are broken down into phases, kept in bins and boxes like a kit, ready for me to work on here and there.

For the bottle brush topiary, I picked a nice bottle brush tree to work with. The brush had to be full and evenly distributed all the way around and the bristles had to be tight. I found these 9″ trees at Michaels.

The first step was establishing the spiral by sticking masking tape around the tree. I started at the base and wound it around the tree all the way to the top.

The masking tape is wound around the tree, starting at the bottom and spiraling around the tree to the top. The tape will mark all the places that the bristles will NOT be cut.

The masking tape is wound around the tree, starting at the bottom and spiraling around the tree to the top. The tape will mark all the places that the bristles will NOT be cut.

I first started cutting out the bristles right in the center of the taped areas as shown here. The first cutting was in the center between the tape, all the way from the base to the top of the tree.
3 Pearl Bottle Brush Topiary
Here you can see what the tree looks like after the first cutting.
4 Pearl Bottle Brush Topiary
To make the second cutting, I cut at an angle from the tape in to meet the deep first cut in the center of the tree.

Cutting at an angle from the tape to the center. The tree was turned upside down to make cuts under the spiral as you can see here.

Cutting at an angle from the tape to the center. The tree was turned upside down to make cuts under the spiral as you can see here.

After the second cutting.
6 Pearl Bottle Brush Topiary
I continued cutting away bristles until there was a nice, neat spiral shape, all between the tape-covered bristles.
7 Pearl Bottle Brush Topiary
The cutting is all finished here.
8 Pearl Bottle Brush Topiary
The masking tape is gently pulled away.

I was so happy with how easy it was to make the spiral shape!

I was so happy with how easy it was to make the spiral shape!


10 Pearl Bottle Brush Topiary
11 Pearl Bottle Brush Topiary
Here is the cut tree next to an identically-taped bottle brush tree. The tape makes it easy to cut an even spiral.
12 Pearl Bottle Brush Topiary
13 Pearl Bottle Brush Topiary
The last step was gluing on the pearly glass and plastic beads. I watched Downton Abbey while doing this and it was a pleasant task. Oh so elegant! I used Fast Grab Tacky Glue and tweezers to place each pearl. No other glue would have been as easy to use because I needed a glue that grabbed fast and didn’t drip. I used two kinds of large pearl beads and a couple different kinds of smaller pearls and pearly beads.

Pearls are glued to the tips of bristles on this Bottle Brush Topiary Tree.

Pearls are glued to the tips of bristles on this Bottle Brush Topiary Tree.

I’m looking forward to displaying this pretty tree next Christmas, tucked amongst the plants in the corner of the dining room.

Pearl Bottle Brush Topiary Tree

Pearl Bottle Brush Topiary Tree

By the way, did you see the beautiful red Poinsettia peeking over in the first photo? When I lifted the poinsettia plant out of the van in early December, three branches broke off. So I stuck them in a glass of water. They are still beautiful, over a month later. =)

Share this:

  • Click to share on Twitter (Opens in new window)
  • Click to share on LinkedIn (Opens in new window)
  • Click to share on Facebook (Opens in new window)
  • Click to share on Pinterest (Opens in new window)
  • Click to share on Reddit (Opens in new window)
  • Click to email a link to a friend (Opens in new window)
  • Click to print (Opens in new window)
  • Click to share on Tumblr (Opens in new window)

Like this:

Like Loading...

Pencil Rolls and Coloring Pages

04 Monday Jan 2016

Posted by Julia Monroe in All Sparkled Up, art, Christmas, color, crafts, DIY, fabric, On my Worktable, photography, projects, Spoonflower, tutorial

≈ Leave a comment

Tags

colored pencils, coloring, coloring books, DIY, fabric, pencil roll, photography, sewing, Spoonflower, tutorial

I hope you all had a wonderful Christmas and New Year’s. We did!

I made the girls Pencil Rolls and custom coloring pages for Christmas. They loved the sets.

Colored Pencil Roll

Colored Pencil Roll

Pencil roll with special coloring pages

Pencil roll with special coloring pages

I used Julie 1971 fabric from Spoonflower.

Julie 1971, a fabric featuring houses made of felt, is available on Spoonflower.

Julie 1971, a fabric featuring houses made of felt, is available on Spoonflower.

The inspiration for Julie 1971 is a piece of artwork I made when I was 12 years old, in 1971. I made the little felt houses from bits of felt and glued them to the back of a piece of laundry detergent box cardboard.
6 Felt Houses Inspiration
The pencil roll was very easy to make. The lining, pocket and flap are linen, the decorative cover wrap is cotton canvas.
7 Felt Houses

Felt Houses

Felt Houses

Even after all these years, the cardboard is still in great shape.

The back of the Felt Houses artwork, clued to a piece of cardboard from a box of All laundry detergent.

The back of the Felt Houses artwork is cardboard cut from a box of All laundry detergent.

My father cut the picture frame from a single piece of wood. The Felt Houses art hangs in our guest room.
5 Felt Houses and fabric
The original artwork is still vibrant and prints beautifully on canvas and linen fabrics from Spoonflower. Here you can see the original art next to canvas, which I have aged a little by machine washing it in warm water.

The pencil roll open, with flap folded over to protect pencil tips and keep the pencils from spilling out during transport.

The pencil roll open, with flap folded over to protect pencil tips and keep the pencils from spilling out during transport.

Outer cover – made of a piece of decorative Julie 1971 fabric 17″ x 8.5″, sewed to a piece of linen 17″ x 4.5″ for the flap, to make a rectangle 17″ x 12.5″.

The outside of the pencil roll, with the flap open.

The outside of the finished pencil roll, with the flap open.

Lining – made of linen cut to 17″ x 12.5″.
Pencil pocket – two pieces of linen 17″ x 4″.

The cover piece with flap was sewn to the lining piece, right sides together, with a small opening for turning at the bottom. This cover piece was turned right side out and pressed flat.

The pencil pocket was made by stitching the two 17″ x 4″ pieces of linen together with a small opening for turning at the bottom. This piece was turned right side out and pressed flat.

The pocket piece was sewn to the bottom of the cover piece. Here you can see how simple the pocket is attached to the cover piece.

The pocket piece was stitched inside the cover piece at the sides and along the bottom.

The pocket piece was stitched inside the cover piece at the sides and along the bottom.

To figure out where to stitch for the pencil pockets, I simply stuck pieces of masking tape vertically, all across the pocket piece, with a little margin between each piece of tape, and stitched between the pieces of masking tape. Several of the pockets weren’t exactly the same size but that was fine. That method of marking for the pockets was super easy and didn’t need any measuring or marking the fabric at all.

To keep the roll shut, I used what I had on hand – stretchy beading elastic tied in a loop.

For each girl, I made a custom set of pictures to color. I used Photoshop to alter photographs and printed the coloring pages on cardstock.

Some of the coloring pages I gave to the girls.

Some of the coloring pages I gave to the girls.

Boxes for pencils are nice, but there is another layer of artsy satisfaction when you unfurl a roll of creamy pencils tucked in soft linen.

Coloring with pencils

Coloring with pencils

Here are two free coloring pages for you keep and print out.

Free coloring page - Do what is Beautiful and Never Give Up

Free coloring page – Do what is Beautiful and Never Give Up

Girl with Flowers in her Hair - a free coloring page for you!

Girl with Flowers in her Hair – a free coloring page for you.

Enjoy!

Share this:

  • Click to share on Twitter (Opens in new window)
  • Click to share on LinkedIn (Opens in new window)
  • Click to share on Facebook (Opens in new window)
  • Click to share on Pinterest (Opens in new window)
  • Click to share on Reddit (Opens in new window)
  • Click to email a link to a friend (Opens in new window)
  • Click to print (Opens in new window)
  • Click to share on Tumblr (Opens in new window)

Like this:

Like Loading...

Video

God Bless Us Every One!

24 Thursday Dec 2015

Posted by Julia Monroe in All Sparkled Up, books, Christmas, encouragement, music, Uncategorized

≈ Leave a comment

Merry Christmas!


Share this:

  • Click to share on Twitter (Opens in new window)
  • Click to share on LinkedIn (Opens in new window)
  • Click to share on Facebook (Opens in new window)
  • Click to share on Pinterest (Opens in new window)
  • Click to share on Reddit (Opens in new window)
  • Click to email a link to a friend (Opens in new window)
  • Click to print (Opens in new window)
  • Click to share on Tumblr (Opens in new window)

Like this:

Like Loading...

More Christmas

26 Friday Dec 2014

Posted by Julia Monroe in baking, Christmas, family, food, sparkling, Uncategorized

≈ 1 Comment

Tags

baking, candy, Christmas, Christmas tree, cookies

I will be away for a bit but want to leave you with a couple photos. I’ll post more when I return.

Making gingerbread.

Making gingerbread.


Gingerbread snowmen with wood pick arms and raisin buttons.

Gingerbread snowmen with wood pick arms and raisin buttons.


Decorating gingerbread.

Decorating gingerbread.


The fun part of making cookies.

The fun part of making cookies.


Christmas 2014 7676
Christmas 2014 7681
Lots of sprinkles!

Lots of sprinkles!


Italian Sienese Nougat Candy

Italian Sienese Nougat Candy


Wrapping each little square of Sienese Nougat Candy in cellophane. Washi tape worked great.

Wrapping each little square of Sienese Nougat Candy in cellophane. Washi tape worked great.


Springerli. The rolling pin and cookie mold are from House on the Hill http://houseonthehill.net/index.php?p=home

Springerli. The rolling pin and cookie mold are from House on the Hill http://houseonthehill.net/index.php?p=home


The first cookie tray for the company office.

The first cookie tray for the company office.


Christmas 2014 7797
Christmas 2014 7798
My mom made the miniature tree under the cloche. I have several small forests of trees; this one is on top of the tall dining room book shelf.

My mom made the miniature tree under the cloche. I have several small forests of trees; this one is on top of the tall dining room book shelf.


We never see our tree lit until Christmas Eve. Every light in the house is turned off and the house is very dark. The light sets are turned on one by one according to the scripture. Here is the very first set, lighting the star at the top of the tree over the manger scene down below.

We never see our tree lit until Christmas Eve. Every light in the house is turned off and the house is very dark. The light sets are turned on one by one according to the scripture. Here is the very first set, lighting the star at the top of the tree over the manger scene down below.


With a completely fused spine, I'm unable to get down to floor level to look through my camera lens so focus is hit or miss. But I love this photo and I can identify with a clueless sheep. Yet my Lord still watches over me tenderly.

With a completely fused spine, I’m unable to get down to floor level to look through my camera lens so focus is hit or miss. But I love this photo and I can identify with a clueless sheep. Yet my Lord still watches over me tenderly.


The tree completely lit about 40 minutes later, Christmas Eve.

The tree completely lit later Christmas Eve. We didn’t have time to put the ornaments on so there are very few. But the lights make the tree lovely!

Share this:

  • Click to share on Twitter (Opens in new window)
  • Click to share on LinkedIn (Opens in new window)
  • Click to share on Facebook (Opens in new window)
  • Click to share on Pinterest (Opens in new window)
  • Click to share on Reddit (Opens in new window)
  • Click to email a link to a friend (Opens in new window)
  • Click to print (Opens in new window)
  • Click to share on Tumblr (Opens in new window)

Like this:

Like Loading...

Merry Christmas

26 Friday Dec 2014

Posted by Julia Monroe in Christmas, family

≈ Leave a comment

Tags

Christmas

The time is late and the date is no longer the 25th. But Christmas Day here doesn’t end until the lights are out. And right now, they aren’t out yet.
It was a day full of joys and bittersweet memory, a little tears and laughter and sweetness. Losing someone precious is never easy. But we’re rejoicing in the hope of heaven and thanking God for providing a way through Jesus. We shall all be together again some day. Here’s to good times, good food and laughter. Here’s to love and family!
I hope you all had a lovely Christmas. ♥
IMG_7794

Share this:

  • Click to share on Twitter (Opens in new window)
  • Click to share on LinkedIn (Opens in new window)
  • Click to share on Facebook (Opens in new window)
  • Click to share on Pinterest (Opens in new window)
  • Click to share on Reddit (Opens in new window)
  • Click to email a link to a friend (Opens in new window)
  • Click to print (Opens in new window)
  • Click to share on Tumblr (Opens in new window)

Like this:

Like Loading...

Angel Curtain Treatment

12 Friday Dec 2014

Posted by Julia Monroe in All Sparkled Up, Christmas, DIY, holiday, home decor, lighting, sunlight, tutorial, Uncategorized

≈ 3 Comments

Tags

angel, Angel Window Treatment, Christmas, Christmas window, curtain treatment, curtains, DIY, home decor, tutorial, window treatment

All I wanted was a little more light in the dining room so I gathered up the curtain in one hand and pulled it up and discovered … an Angel Curtain Treatment!

Angel Curtain Treatment

Angel Curtain Treatment

[Please excuse my unwashed window. We’ve pared back on a lot of things since my surgery. ;) ]

Normally, the sheer curtain just hangs over a tension rod stuck in the window frame. I don’t hang the curtain full length as normal, using the rod through the curtain sleeve, but rather just drape the floor-length panel over the tension rod so the pretty embroidered bottom edge hangs about halfway up the window as seen in this fall photo.
I also like the double thickness of the sheer when I hang the curtain like that.
1 b Fall arrangement 2014

To make the angel curtain treatment, all you need are two S hooks with lengths of ribbon tied on and whatever decoration you want to use for the top of the “angel head.” That’s it! One end of the ribbon is shorter than the other when tied, as you can see here.
2 Angel Curtain Treatment

I made two S hooks from an old hanger, making sure they would fit over the tension curtain rod. I like using the inner stiffening layer from men’s ties as ribbon. (You can see what else I used the tie pieces for here.) In this tutorial, I will call the wool tie interlining pieces “ribbons” for clarity.
3 Angel Curtain Treatment

The curtain is very light and airy and you can see how long it is here. I’m not sure this treatment would work as easily with a heavier curtain. Also, the top of the curtain will actually be the bottom of the angel’s dress. So the back of the curtain’s hemmed sleeve must look good.
4 Angel Curtain Treatment

To begin making the angel, the S hooks with ribbons were hung near the center of the rod.
5 Angel Curtain Treatment

The two shorter ends of the ribbons were tied loosely across the middle, wrapped several times to make the ends hang at the sides of the “angel head.” I didn’t have to tie any knots because the rough tie fabric held position easily when wrapped around several times. But if your ribbon is slick, like satin, you will have to pin it together to make it stay.
6 Angel Curtain Treatment

Here I’m lightly gathering the curtain in one hand, a little above the embroidered edge. I adjusted the curtain length over the rod and made sure the embroidered edge was arranged with pretty folds as I gathered it together.
8 Angel Curtain Treatment

Once the curtain was gathered together in my hand, I raised it up.
9 Angel Curtain Treatment

Again, I adjusted the folds to adjust the bottom of the curtain.
10 Angel Curtain Treatment

Once the curtain was held up, I looped the long left ribbon under and around the bundle of gathered curtain.
11 Angel Curtain Treatment
12 Angel Curtain Treatment

The two long long lengths of ribbon tie were tied together under the gathered bundle.
13 Angel Curtain Treatment

I fine tuned the embroidered curtain edge, pulling it down a bit to make it longer.
14 Angel Curtain Treatment

Here you can see the curtain sleeve from the top of the curtain now hanging at the bottom of the angel’s dress.
15 Angel Curtain Treatment

To finish the angel, I simply tucked a small halo of gold star holiday wire and a Christmas package decoration on top of the ribbon tie.
16 Angel Curtain Treatment
17 Angel Curtain Treatment

The finished Angel Curtain Treatment

18 Angel Curtain Treatment

An angel spreads her wings of sheer batiste. She disappears at night when I let the curtain down and the window sill lights shimmer through like stars.

To make this window treatment took less than 5 minutes. Seriously, it took longer to rummage through my old ribbon box to find the package decoration! To take it down, simply untie the ribbon from behind the curtain and remove the S hooks. Super simple.

And Thank You, Brenda, for your husband’s ties. This project finished up the linings I had from the first batch of ties. Your bag of ties will be plenty for new projects!

Share this:

  • Click to share on Twitter (Opens in new window)
  • Click to share on LinkedIn (Opens in new window)
  • Click to share on Facebook (Opens in new window)
  • Click to share on Pinterest (Opens in new window)
  • Click to share on Reddit (Opens in new window)
  • Click to email a link to a friend (Opens in new window)
  • Click to print (Opens in new window)
  • Click to share on Tumblr (Opens in new window)

Like this:

Like Loading...

The dining room forest

11 Saturday Jan 2014

Posted by Julia Monroe in Christmas, home decor

≈ 1 Comment

Tags

bottle brush trees, Christmas decor, Christmas decorations, Christmas trees, the dining room table

After they graced the tops of cabinets, and before they got put in a large box in the attic, the tall alpine trees became a forest on the dining room table.

1 Bottle Brush tree forest
2 Bottle Brush tree forest

I usually do a better job on the lights but I'm a little shaky standing on a chair this year. Even so, the trees looked lovely against the new cream colored walls.

I usually do a better job on the lights but I’m a little shaky standing on a chair this year. Even so, the trees looked lovely against the new cream colored walls.


4 Bottle Brush tree forest
5 Bottle Brush tree forest
6 Bottle Brush tree forest
7 Bottle Brush tree forest
8 Bottle Brush tree forest
I adore trees, real and not real. If I didn’t need this table so much, I wouldn’t mind leaving the trees there all year. I know my granddaughter would have loved playing with little dolls in the forest. Next year, I will get the trees out a week before we decorate, just so the dolls can play hide & seek in the dining room forest.

Share this:

  • Click to share on Twitter (Opens in new window)
  • Click to share on LinkedIn (Opens in new window)
  • Click to share on Facebook (Opens in new window)
  • Click to share on Pinterest (Opens in new window)
  • Click to share on Reddit (Opens in new window)
  • Click to email a link to a friend (Opens in new window)
  • Click to print (Opens in new window)
  • Click to share on Tumblr (Opens in new window)

Like this:

Like Loading...
← Older posts

If you are a non-WordPress follower, enter your email address to follow this blog and receive notifications of new posts by email.

Tags

allsparkledup All Sparkled Up altered book art baking beach beads bird bread breakfast cake candy carving cat cats chocolate Christmas Christmas tree cookies craft crafts dessert DIY Easter Easter eggs eggs egg tree encouragement fabric family figs flowers food funny gardening Gilded Girls God granddaughter grandkids heart home decor hope inspiration inspirational jewelry jewelry making joconde light Little Plastic Bears miniature miniatures mixed media mousse nature painting PB & J pets photo photography projects recipe roses salad Scoliosis scripture sewing snow sparkling Spoonflower sunlight sunset Sunset Beach surgery tablescape tea tree tutorial Valentine's Day vintage book words

Archived Posts

Top Posts & Pages

Sourdough Breadstick Cobras
Marble window sills
Sfogliatelle
The Day the Baby Hawks Learned to Fly
Woven Tortillas
We made up a new recipe - PB & Jam Joconde Cake - Part 3
Sugar Bonnets
A Welded Valentine!
Angel Curtain Treatment

Recent Posts

  • Sfogliatelle
  • Blue Willow Toile
  • The Kitchen tea towel
  • The little cake she decorated
  • Icing flowers
  • Matthew 11:28
  • Christmas at Sea Tablescape
  • Gratitude
  • The Hot Air Balloon mobile has lights
  • Journaling in Coloring Books
  • The Light is still here.
  • A Hot Air Balloon decoration for my granddaughter’s room
  • Coco’s new favorite hangout
  • My kitten is growing
  • English roses fabric

Post Categories

All Sparkled Up allsparkledup altered books American Girl Dolls art baking Baking for Neighbors ballet beach beading BFN birthday books cake decorating calligraphy candy cats Christmas color community cooking Craft Fail crafts DIY dolls drawing Easter encouragement Etsy fabric family fashion design Favorite Childhood Books flowers food Free Idea funny gardening Gilded Girls Gilded Life God granddaughter grandkids handmade books holiday home home decor Inspirational jewelry making journals lighting Little Plastic Bears Mexican miniature mixed media music nature New Years On my Worktable painting party pets photography Princess doll projects recipe Scoliosis Scripture sewing sketchbook sparkling Spoonflower sunlight sunset tea time Thanksgiving The cats time tools travel tutorial Uncategorized Valentine's Day water wedding woodwork words wreath
Follow All Sparkled Up on WordPress.com

Blog at WordPress.com.

Privacy & Cookies: This site uses cookies. By continuing to use this website, you agree to their use.
To find out more, including how to control cookies, see here: Cookie Policy
  • Follow Following
    • All Sparkled Up
    • Join 289 other followers
    • Already have a WordPress.com account? Log in now.
    • All Sparkled Up
    • Customize
    • Follow Following
    • Sign up
    • Log in
    • Report this content
    • View site in Reader
    • Manage subscriptions
    • Collapse this bar
 

Loading Comments...
 

    %d bloggers like this: